4.0 - Form Designer
Forms are used to enter or view information about a variety of mapped features (System Point, Septic Tank, Drain Field, etc.) and tabular records, such as Operations and Maintenance. Creating a Form is conducted using the Form Designer. This section reviews the Form Designer and provides examples of creating Forms.
Key Concepts
-
A Form is built from a map layer or tabular record and can include any of the fields (attributes) for the corresponding mapped feature or tabular record. For example, a Septic Tank Form may include fields like Capacity Gallons, Type and Material, but it would not include fields for a Soil Boring or Drain Field.
-
Forms can include other Forms, or Linked Data Forms, so that additional information can be entered/viewed. For example, a System Form (System point map layer) can include as Linked Data Forms a Septic Tank, Drain Field and Soil Boring Form. The result is that a user can enter/view information for the System, Septic Tank, Drain Field and Soil Boring in one Form.
-
Forms are used to serve a number of workflows, including data collection, viewing information and creating output specific to a task, such as an O&M event. When designing a Form consider the potential uses and if needed created iterations of the same Form to serve additional workflows.
-
Any number of Forms can be created and saved. An existing Form can also be used as a Template to create another Form. This enables users to quickly iterate through a number of similar Forms using a Template. For example, you may have a Form for a gravity system, dosed system, pressure dosed system and alternative system where each Form is targeted to the specific system.
Exercise Menu
Use the menu below to jump to a specific task/workflow.
- Form Designer Menus:
Provides an overview of the Form Designer Menus.
- Create New Form:
Using Form Designer to create a new Form for a Septic Tank.
- Using Linked Data Forms:
Create a new Form using a Template and add a Linked Data Form to an existing Form.
Form Designer Overview
1.0 Open the Form Designer by selecting the Form Designer button on the Main Menu.

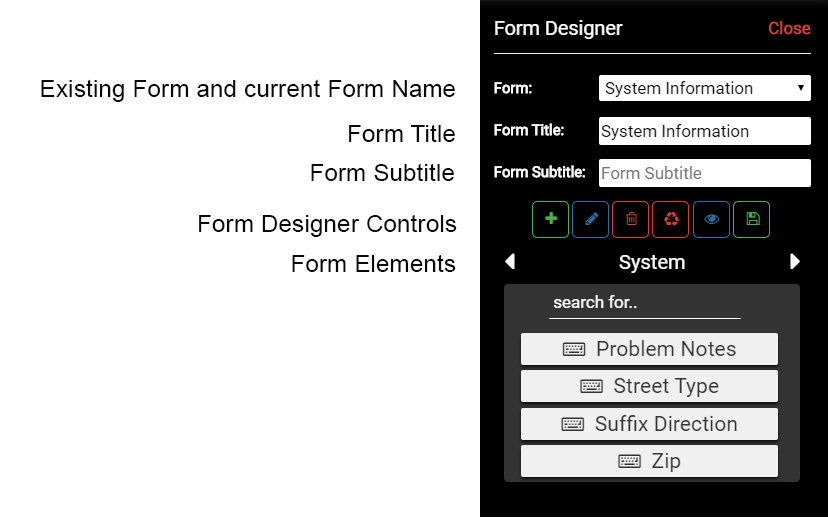
1.1 The Form Designer will open and display a blank Form or an existing Form if one has been created. The Form Designer Menu will be used to manage Forms, including creating, editing, deleting, previewing and saving Forms.
The menus are reviewed below:
1.2 The Form Designer Menu provides the following options:
-
Form: is used to select an existing Form and displays the current Form name.
-
Form Title: displays the current Form Title. The Form Title will be blank for a new Form.
-
Form Subtitle: displays the current Form Subtitle. The Form Subtitle will be blank for a new Form.
-
Form Designer Controls: used to Create Form, Rename Form, Delete Form, Clear Workspace, Preview Form and Save Form.
-
Form Elements: elements that make up a Form, including Form Fields, Layout, Feature or Tabular Record Fields and Linked Data Forms.
Form Designer Menu
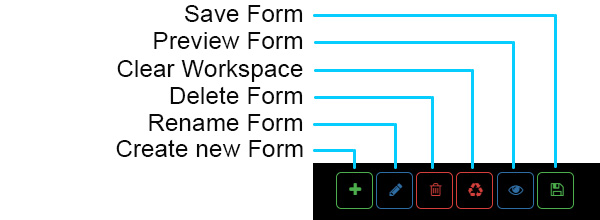
1.3 The Form Designer Controls provide the following options:
-
Save Form: saves edits made to a Form.
-
Preview Form: provides a working preview of the Form.
-
Clear Workspace: Remove all Form Elements in the active Form. Note that this operation can't be undone.
-
Delete Form: delete the active Form.
-
Rename Form: rename the active Form.
-
Create New Form: creates a new Form with a blank workspace.
Form Designer Controls
1.4 The Form Elements used in a Form are described below:
-
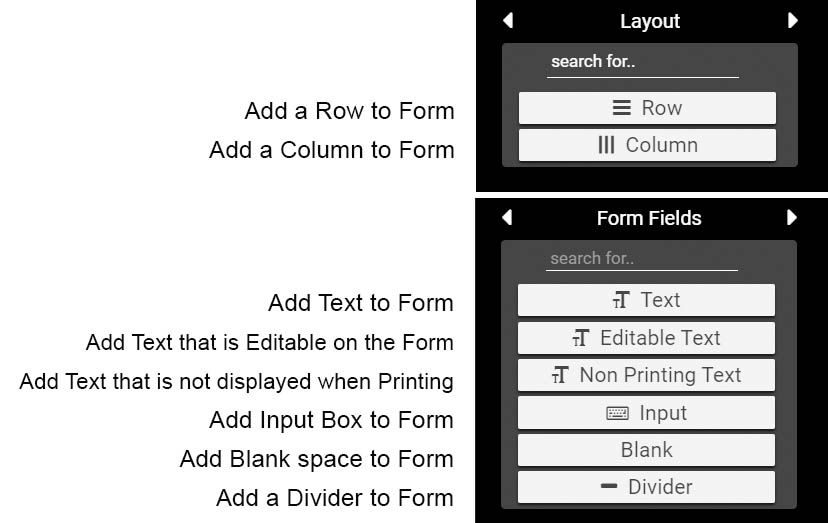
Row: to add a new Row, drag the Row element onto the Form.
-
Column: to add a new Column, drag the Column element onto the Form.
-
Text: to add Text to the Form, drag the Text element onto the Form
-
Editable Text: to add Editable Text to the Form, drag the Text element onto the Form. Editable Text is Text that appears on a Form as Text, but when you select Print on the Form the Text becomes editable. Use Editable Text for items such as Stipulations or Site Requirements that need to be dynamic.
-
Non-Printing Text: to add Non-Printing Text to the Form, drag the Text element onto the Form. Non-Printing Text is Text that will not be displayed when printing or creating a PDF. This text can be used for instructions, notes or other reference text that does not need to be on the final output.
-
Input: to add an Input box to the Form, drag the Input element onto the Form. Note that this is a general Input box, and the value entered into the Input box is not saved under any map layer or table record.
-
Blank: to add a Blank (white space) spacer to the Form, drag the Blank element onto the Form.
-
Divider: to add a Divider (horizontal line) to the Form, drag the Divider element onto the Form.
Layout
Form Fields
Form Elements
-
Add another Form (Linked Data Form) to an existing Form. Use Linked Data Forms to combine multiple Forms into a single Form. For example, a System Form may include Linked Data Forms for Septic Tanks and Drain Fields.
-
Add Fields to a Form. The Fields displayed in the list are the Fields that correspond to the Form type, such as System in the image. In this example the Fields listed are all Fields present in the System point map layer. Note that some Fields correspond to a Table Record, such as Operations and Maintenance records.
Each Field has an icon that indicates the type of data entry for the Field, including Manual Entry, Drop Down List and Date Picker.
Use the 'search for ...' input area to search for a specific field. Selecting the question mark button will also open up a library of the current Fields and their corresponding values.
Linked Data Forms
Map Layer or Table Name (System layer in image)
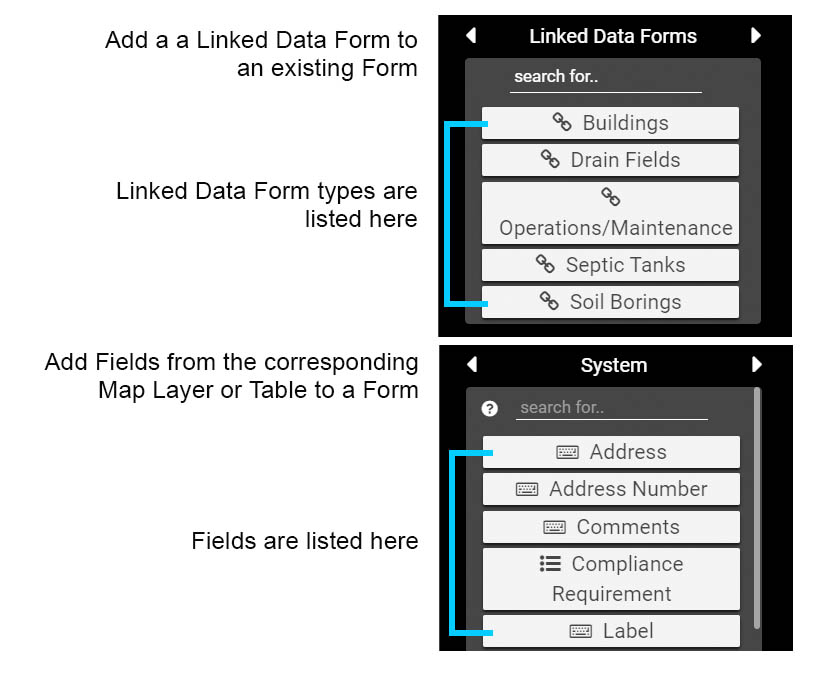
Form Elements
4.1 - Creating Forms
Creating a new form can include creating a Form from scratch, or creating a new Form from an existing Form. Any number of Forms can be created with each saved Form being organized by Map Layer or Table Record. This section will provide details on creating a new Form.
Creating a New Form
2.0 Select the Create Form button to start a new Form. This will open the menu displayed below:
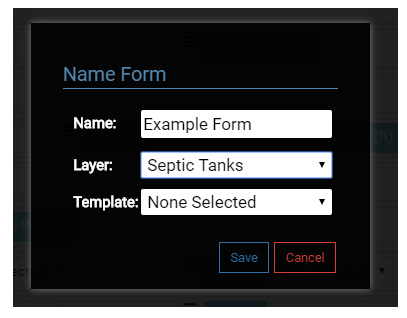
2.1 Enter a Name for the new Form, select the Layer that the Form will be based on and select Save to finish.
Note that you could also use a Template to start a new Form. A Template is simply an existing Form that is used as an exact copy to start a new Form.
Templates are useful when you need to setup standards for basic Forms, such a the System Form, that are used for many workflows. Templates also make it easy to iterate through a series of Forms that only differ slightly, such as a Form for a gravity bed, dosed bed, pressure dosed bed, trench or alternative system.
In the Drain Field example, each Form might only vary slightly based on the system type, but because each Form is specific to a system type there would also be fewer blank or non-relevant fields.
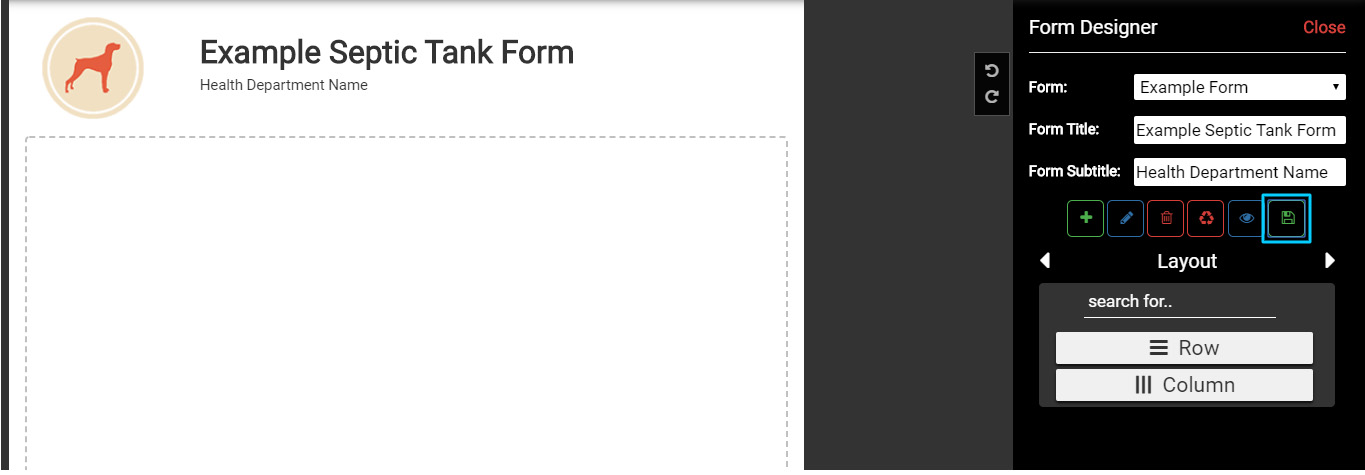
2.2 Once the new Form is Saved, enter a Form Title and a Form Subtitle. Select Save Forms to save the edits.
Add Form Title & Subtitle
2.3 In the Form Elements, page left or right using the arrow buttons to the Layout. Add a new Row by dragging the Form Element Row from the menu onto the Form.
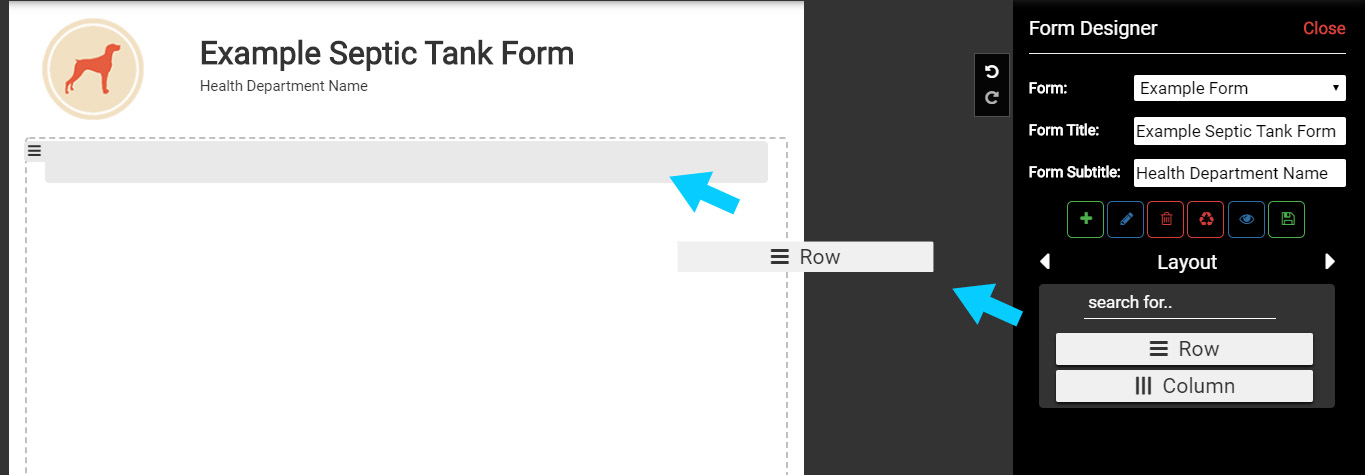
Adding a Row to a Form
2.4 In the Form Elements go to the Form Fields. Add a Text to the top Row and then type General Information.
2.5 The Menu nested in the Row controls the Text or the Form Element. The Menu outside of the Row (left side) controls the Row.
Use the +/- buttons to change Font Size. Increase the Font of the Text to 14.
Center the Text using Align Center button.
The Move button is used to drag a Form Element, in this case Text, to a new location. The Delete button is used to remove the Form Element, or a Row/Column if used on the Row/Column Menu.
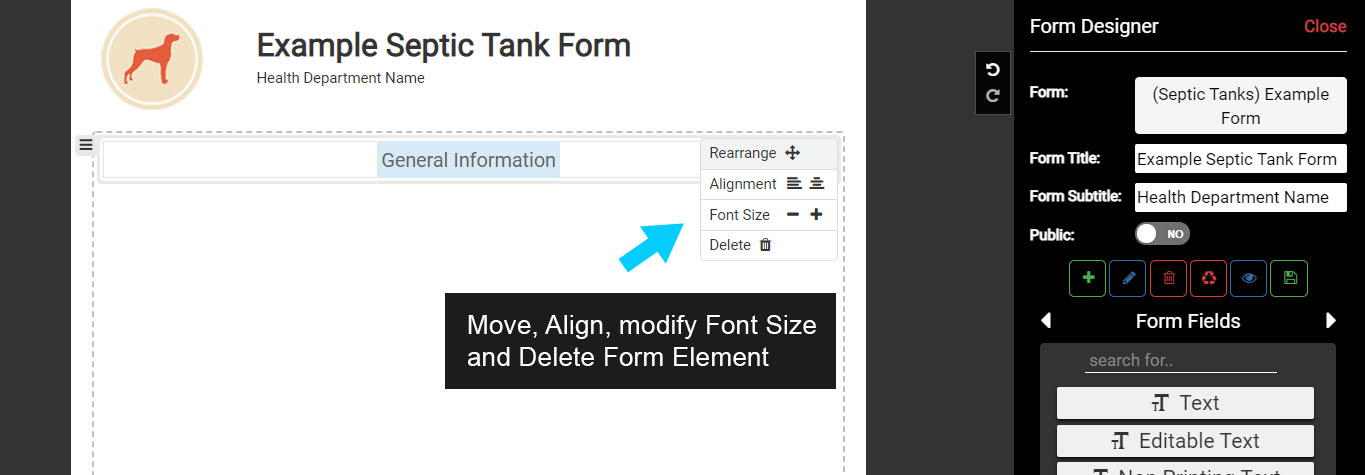
Add Text & Form Element Controls
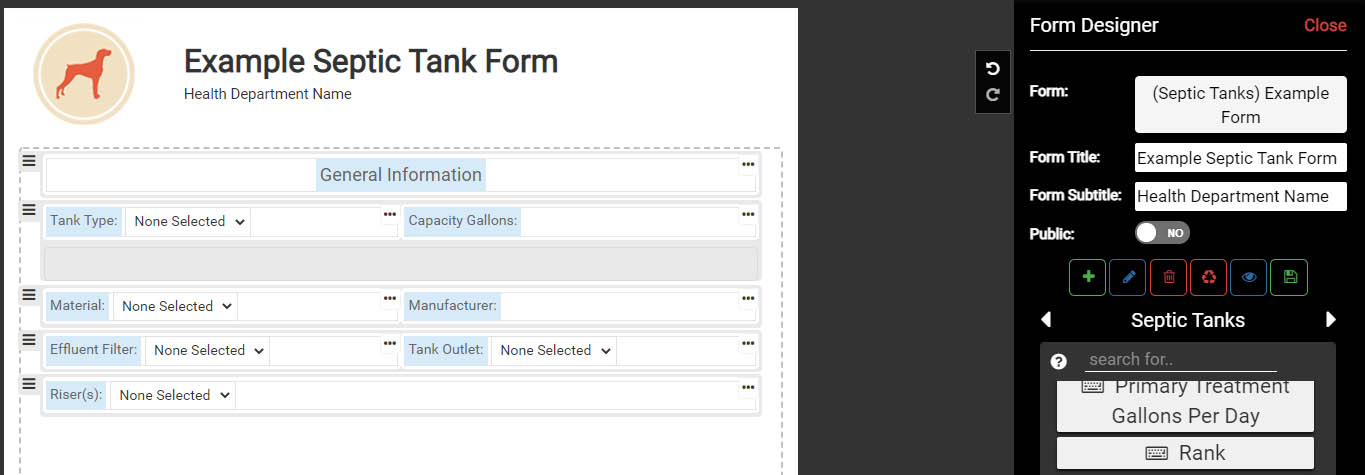
2.6 In the Form Elements go to the Septic Tanks, which lists all of the fields available for collecting information about a Septic Tank. Add the following Fields to the Form:
Note that you can drag a Form Element, in this case a Septic Tank Field, to the blank space beneath the second Row and it will automatically create a new Row. You can also use the 'search for...' menu to type in a Field name.
-
Type
-
Capacity Gallons
-
Material
-
Manufacturer
-
Effluent Filter
-
Tank Outlet
-
Riser
Notice that when a Field is added to the Form, that Field is no longer present in the list of Fields under the Septic Tanks.
Save the Form
2.7 Next, move the cursor over the Type and add the word Tank to result in Tank Type as the new text.
The renaming or modifying the Field name is called aliasing. Note that aliasing does not change the Field name in the database, it only modifies the Field name on the front end (the Form).
Save the Form
Add Septic Tank Fields to Form
2.71 Move the cursor over the three dots in the upper right corner of the Type field. Select the three dots to expand the menu and select 'Default Value'.
The Default Value is used to automatically set a common field value, such as Septic Tank, when entering data in a Form. Select Septic Tank to make it the Default Value.
Note that once a field has a Default Value, a comment icon will appear under the field name.
Save the Form
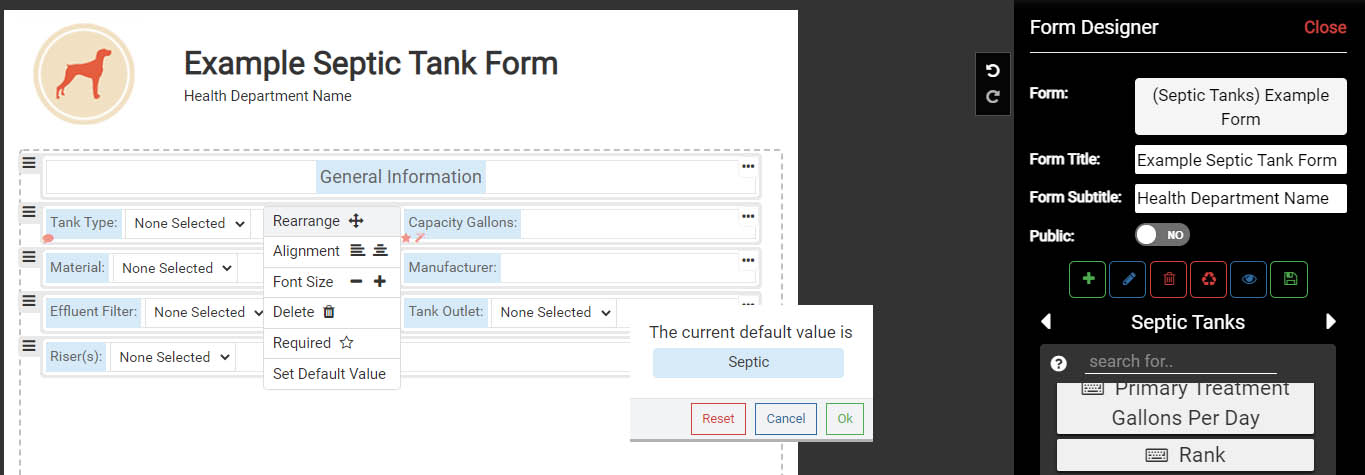
Set Default Value
2.72 Move the cursor over the Capacity Gallons field menu.
Click on the three dots (menu) in the upper right corner to open the drop down menu and select 'Required'. Setting a field to Required will force the user to enter a value for the field before the Form can be saved.
Note that once a field is set to Required, a star icon will appear under the field name.
Save the Form
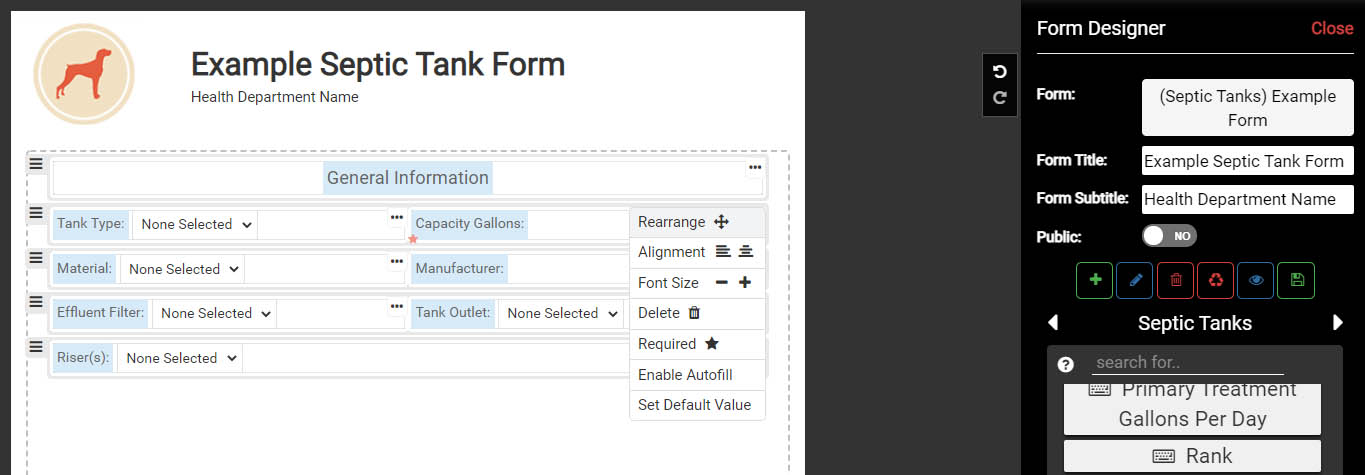 Set Required Fields
2.73 Use the same menu in the Manufacturer field to 'Enable Autofill'.
When a field has Autofill enabled, the values entered in that field are used to provide auto values when a user is entering data. For example, if a user enters the value 'Acme' as a Manufacturer, anytime the Form is used again to enter data the value Acme will automatically come up as an option when the letter 'A' is typed.
The Enable Autofill is a quick way to build standardization in fields where a value is entered manually. For example, users can quickly build a list of Installers, Manufacturers, Approved By and any other manual entry field.
Note that once a field is set to Enable Autofill, a wand icon will appear under the field name.
Save the Form
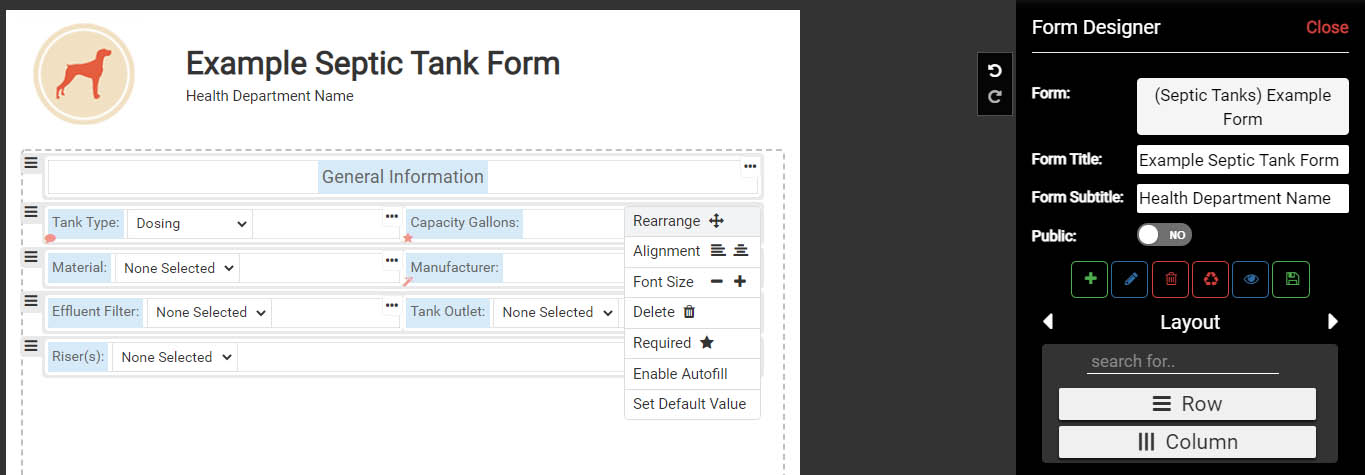
Enable Autofill
2.8 Add another section to the Form with information about the status and general permit information. Add the following:
-
In the Form Elements go to Form Fields and add a Blank element after the last Row. This will create spacing.
-
In the Form Elements go to Form Fields and add Text as a new Row. Enter Permit Information for the Text, change the Font Size to 14 and Center Align the Text
In the Form Elements go to Septic Tanks and add the following Fields:
-
System ID
-
Label
-
Status
-
Install Type
-
Issued Date
-
Issued By
-
Install Date
-
Installed By
-
Approved Date
-
Approved By
-
Comments - modify, or alias Field name to Notes
Save the Form
2.9 Select the Preview button to see how the Form will look when entering or viewing information. Select the Preview button again to close the Preview.
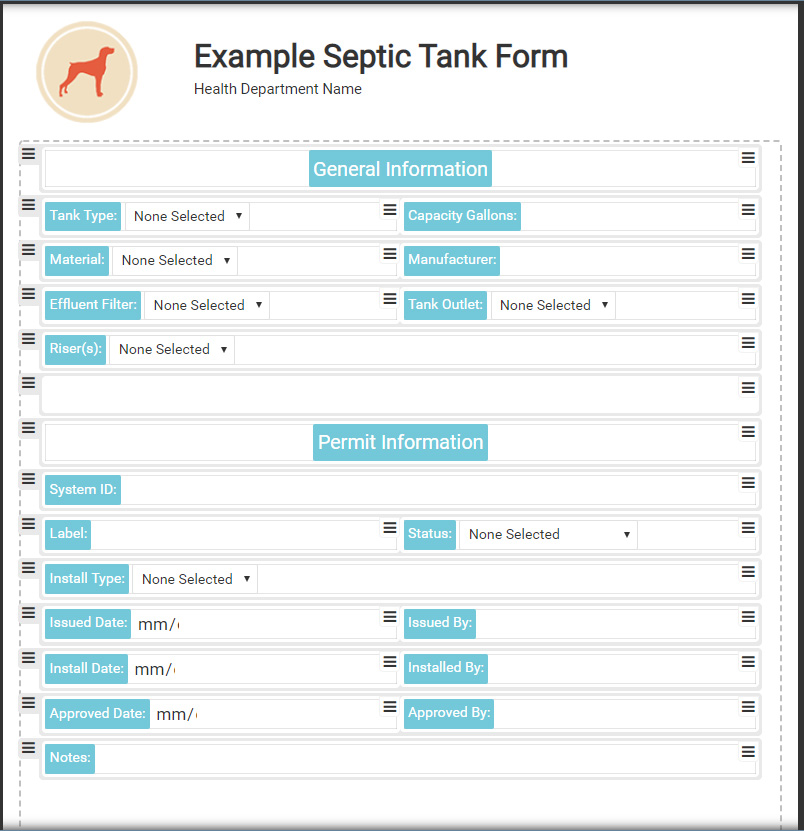
Septic Tank Form
4.2 - Linked Data Forms
A Linked Data Form is a Form Element that is embedded in another Form. For example, a System Form that includes Linked Data Forms for a Septic Tank, Drain Field, Soil Boring and Building.
The number of Linked Data Forms available for each Map Layer varies depending on the Map Layer. A System Form will have the most Linked Data Forms available to use because it acts as the management unit for components, such as the Septic Tank, Drain Field and Soil Borings, but also for events, like O&M.
Recall that mapped features and unmapped features/events are added to a System point, which means they are linked to the System point. This link relationship is what determines what Linked Data Forms are available for each map layer.
Using Linked Data Forms
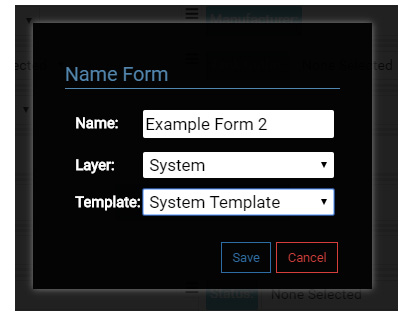
3.0 Start by creating a new System Form. Select the Create Form button.
3.1 Name the new Form Example Form 2, for the Layer select System, and for this Form use a Template by selecting System Template.
The System Template Form is a System Form that was created to store basic information about a System Point. It is a good Form to use as a Template to create other System Forms, and here, you will use it to create a new System Form (Example Form 2).
3.2 When the new System Form opens, change the Title to Example System Form and enter a Subtitle.
Save the Form.
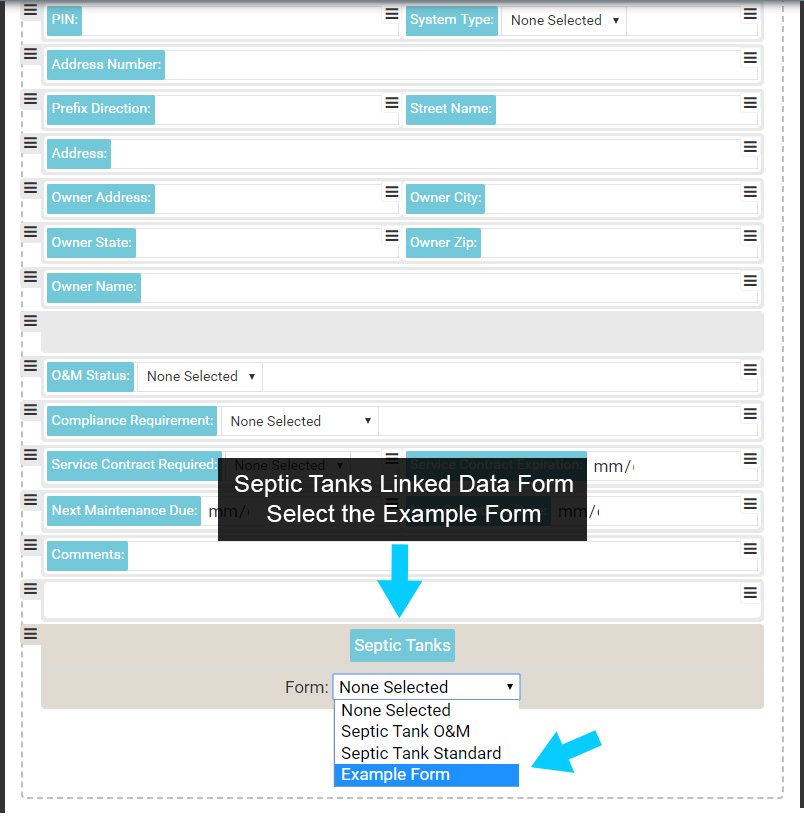
3.3 Scroll down to the last Row in the Form (Comments) and add another Row that contains a Blank spacer. The Blank spacer can be added under Form Fields.
3.4 In the Form Elements, go to Linked Data Forms and add a Septic Tank Linked Data Form to the System Form under the Row with the Blank spacer.
Using the Form drop down menu located under the text Septic Tanks, select Example Form from the drop down menu. This will set the Linked Data Form Septic Tanks to the Example Form.
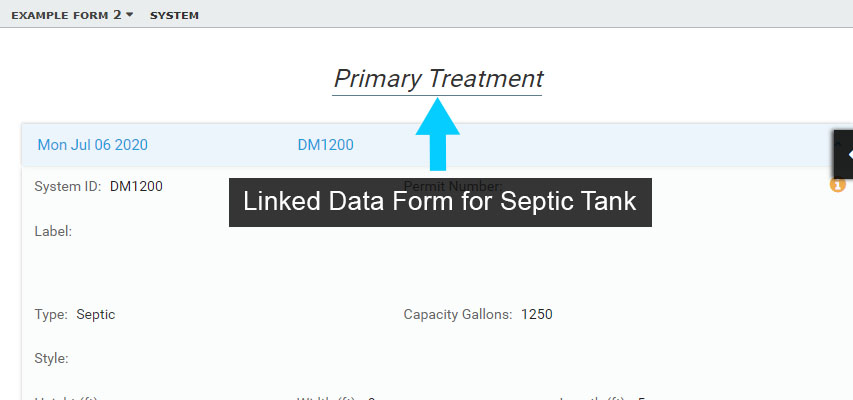
3.5 Next, move the cursor over the Septic Tanks text on the Form. Change the text to Primary Treatment or another version of Septic Tanks - just note that you can modify this header text.
Save the Form.
Adding a Linked Data Form
View the New Form on the Map
4.0 Make sure the Form has been saved and close the Form Designer.
4.1 On the map locate a System point, or map a new one and be sure to enter a System ID.
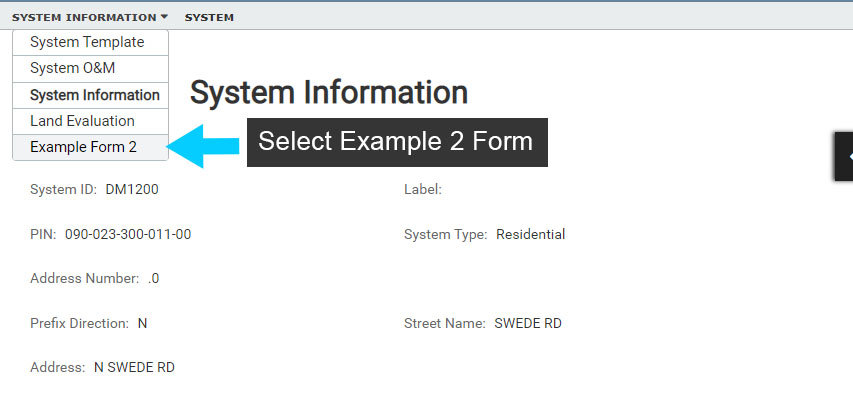
Select the System point, then select 'Show Form'. This will open the System Form, but the Default Form is likely a System Form other than the Example Form 2 you created.
4.2 In the Form drop down menu select Example Form 2. Then scroll down to see that the Example Form you created for Septic Tanks (Primary Treatment) is also displayed.
Note that if a Septic Tank has not been created under the System point, no information will be displayed in the Septic Tank portion of the Form. If this is the case, select the Edit button and add a Septic Tank.
4.3 To clean up the Forms created in this example, open the Forms Designer and either Rename the Forms for continued use, or Delete them.
To Delete a Form, the Form that is to be Deleted must be the active or open Form in Form Builder.
Selecting a Form
Linked Form View