3.0 Mapping & Data Entry
Mapping and data entry for an Onsite System or Well starts by establishing either a System point on the map to manage any Onsite System features and their corresponding information (Applications, Permits, Inspections, O&M, Septic Tank, Drain Fields, etc) , or a Well to manage any Well features and corresponding information (Water Samples, Well Inspections, etc.)
Important: any information about an Onsite System or Well must be managed using the System point or Well if you want to leverage Insights tools like Visualizations, Filters and Reporting.
When adding information about an Onsite System or Well, consider that the information you enter will determine how Insights, like Visualizations, Filters and Reporting can be used to better understand both Onsite System and Wells.
Considering Insights provide tools for understanding Onsite Systems and Wells, we recommend entering information about the Status, Type, Size/Capacity and a Date, such as Approved/Final Date, of Onsite Systems and Wells.
Mapping and initial data entry for Onsite Systems and Wells is initiated by selecting the Feature Editing Controls button on the main menu. Selecting this option opens new menus that are displayed in the side pane. These menus provide access to map the initial System point or Well.
3.1 Mapping Workflow
To access mapping and editing tools select the Feature Editing Controls button on the Main Menu. This opens the side pane with new menu options to Create Features and Edit Features.

Note that when using the System point in your workflows, mapping system components (Septic Tank, Drain Field, Building, Soil Boring) can also be conducted directly from a Form.
The Create Features menu is used to select a feature type that will be mapped, such as a Well, Septic Tank, Measurement Line and more. Selecting a feature type from the Create Features menu will open a new menu, which will provide additional tools for mapping the feature selected. Menu options will vary depending on the feature being mapped.
Editing feature geometry, such as moving a feature, rotating a feature or deleting features, is completed in the Edit Features menu, which is opened when selecting an existing feature on the map.
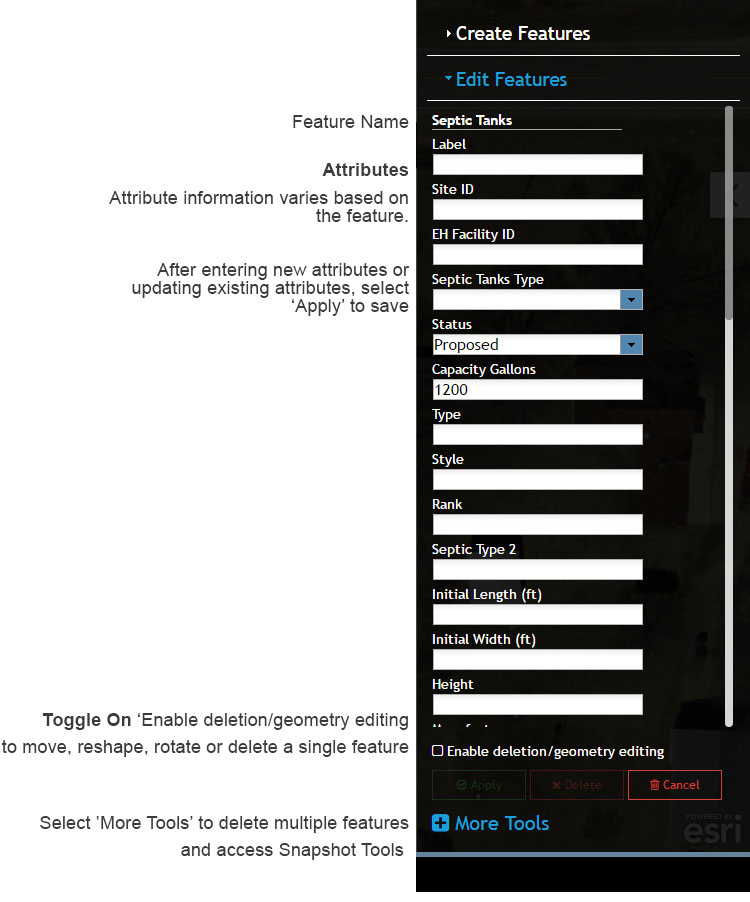
Note that modifying information (attributes) for a mapped feature is accomplished using the corresponding features Form (Septic Tank Form).
The mapping workflow follows the steps below:
- Select the System point to map a new system.
- Select a feature to map in the System or Well Form, or from the Create Features menu (Measurement Line, Laterals, Tapers, Custom Features, etc.).
- Use the Map Tools to create the feature geometry (point, line or polygon) on the map display.
- Enter information for the mapped feature using a Form.
- Conduct feature geometry edits as needed using the Edit Features menu.
- Create 'Snapshot' of the mapped features to preserve and archive Proposed features.
The following sections provide more information about the mapping tools available in the Drawing Tools menu and Edit Features menu. An example exercise is also provided at the end of this section and was developed to help users become more familiar with mapping a variety of features for a hypothetical building site.
3.11 Create Features Menu
The Create Features menu provides a list of features that can be mapped. To map a new feature select a feature type and the Map Tools for that feature will open. The Map Tools menu will display mapping tools specific to the type of feature that is to be mapped. For example, mapping a Well (point) requires different Map Tools than mapping a Septic Tank (polygon) or a Measurement Line (line).
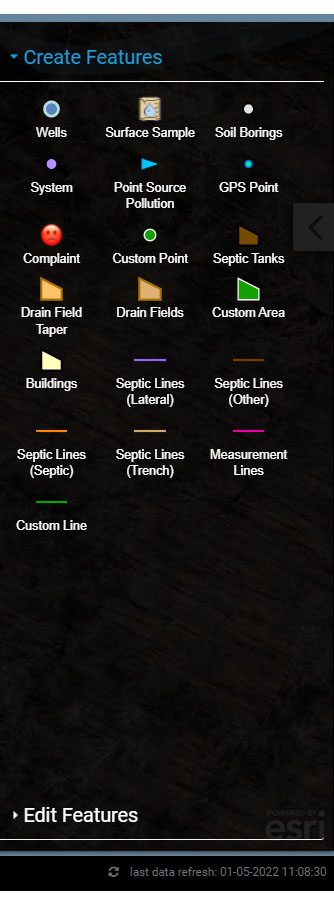
Create Features Menu
3.11.1 Create Features Using a Form
Features can also be mapped using a Form by selecting the 'Add to map' button. Selecting the 'Add to map' button will open the Map Tools menu for the feature that is to be mapped as described in 3.11 above.
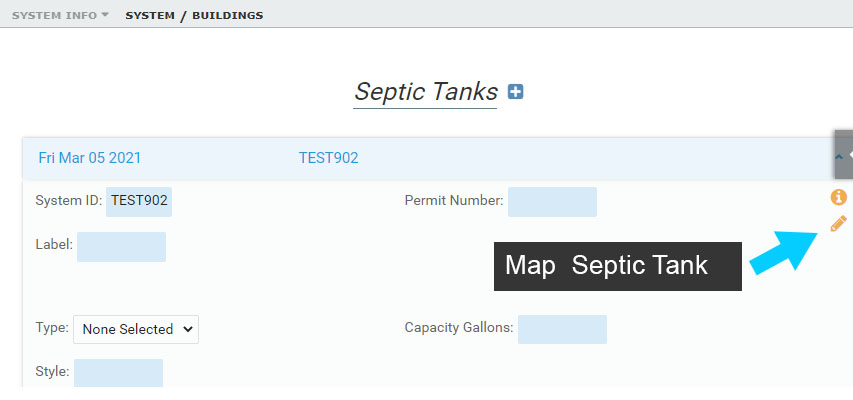
Mapping Features from a Form
3.12 Draw Tools - Line Features
To start mapping a line feature and activate all of the Draw Tools click a starting point on the map display.
Common Line Features: Measurement Lines, Septic Lines and Custom Lines.
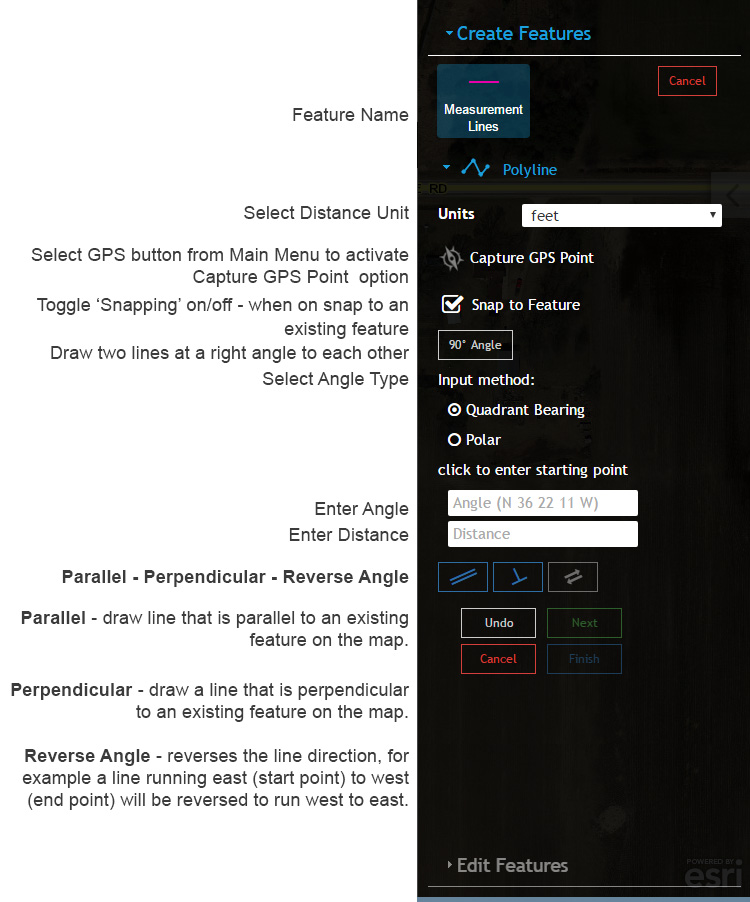
Draw Line Tools
3.13 Draw Tools - Polygons as Rectangles
Polygon features can be mapped by a user defined Rectangle.
Common Polygon Features: Septic Tank, Drain Field, Buildings and Custom Area.

Draw Rectangle Tools
3.14 Draw Tools - Polygons
Polygon features can be mapped using advanced Polygon tools.
Common Polygon Features: Septic Tank, Drain Field, Buildings and Custom Area.
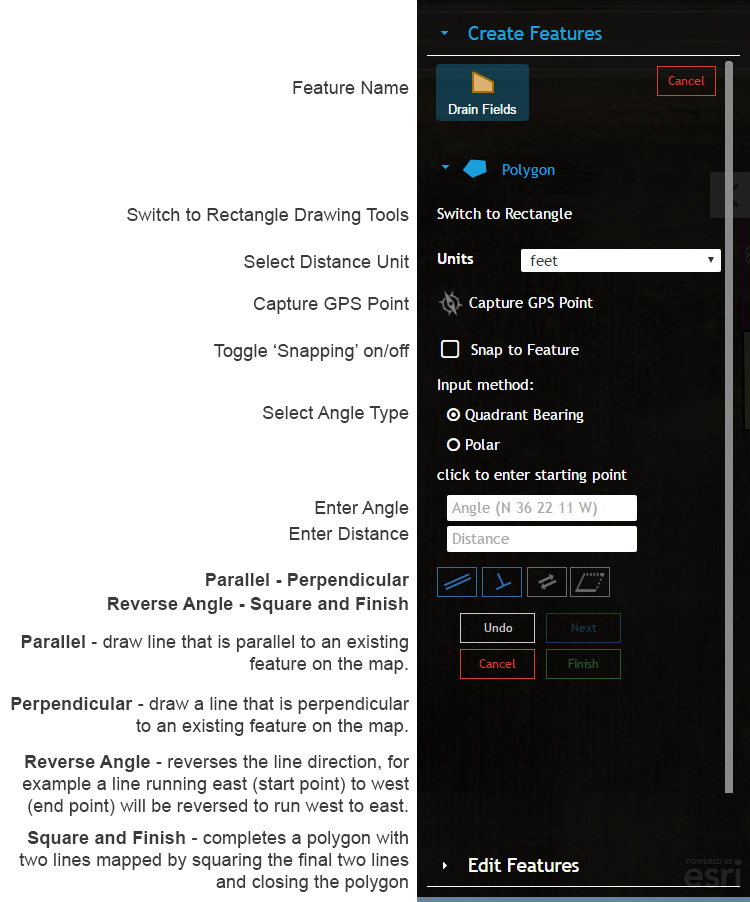
Draw Polygon Tools
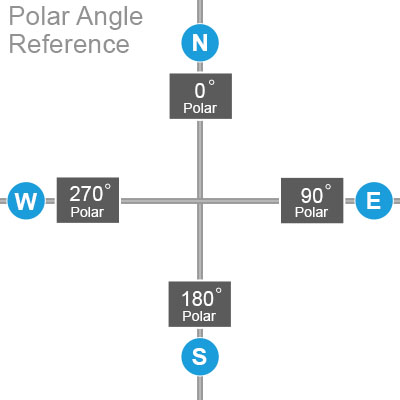
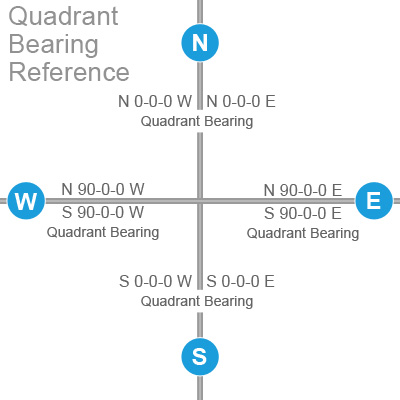
3.15 Angles
There are two options for entering angles when mapping a feature. Use the Polar Angle Reference and Quadrant Bearing Reference below to understand how to input each angle type.
Polar Angle Example Inputs:
N = 0
SW = 225
Quadrant Bearing Example Inputs
Breakdown of Angle
N DD MM SS W where:
DD is Degrees
MM is Minutes
SS is Seconds
N and W is Quadrant (NW)
Example Quadrant Bearing
N 45 20 15 W
3.16 Edit Features Menu
The Edit Features menu opens after creating a new feature or when an existing feature is selected using the Pan tool.
Note that when using Forms, editing feature attributes can be accomplished using the Form instead of using Edit Features menu. Simply select the System point or other mapped Feature (Soil Boring, Building, Septic Tank, Drain Field, Well) and then select 'Show Form' in the Information Window.
Edit Features Menu
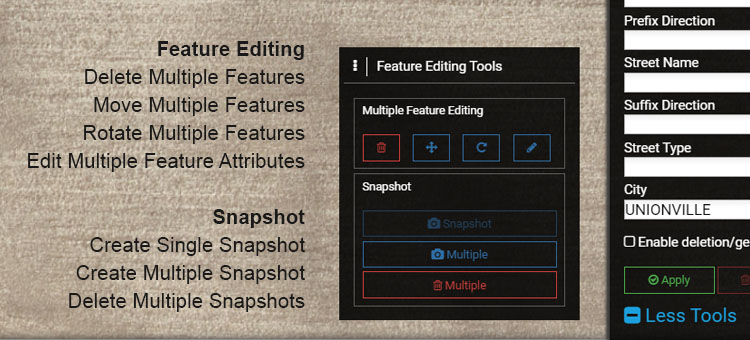
3.17 More Tools
Select 'More Tools' on the Edit Features menu to open the More Tools menu for deleting and moving multiple features, and creating and removing Snapshots. When using any of the tools a new menu will open to guide the specific workflow.
Feature Editing Menus
Delete Multiple Features: use to delete multiple features from the map.
Move Multiple Features: use to move multiple features.
Rotate Multiple Features: use to rotate multiple features.
Edit Multiple Feature Attributes: use to modify an attribute of multiple features, such as updating the O&M Permit Expiration date on multiple System points.
Snapshot Menus
Create Single Snapshot: use create a Snapshot for a single mapped feature.
Create Multiple Snapshots: use create multiple Snapshots for more than one mapped feature.
Delete Multiple Snapshots: use to delete multiple Snapshots from the map.
More Tools