3.3 Mapping Exercise Two - Editing
At times you will need to modify information about a feature or edit the feature on the map. This exercise will go over common editing workflows using both Forms and the Edit Features menu to update feature information and edit feature geometry (move, rotate, etc.).
Exercise Menu
- Add/Update Feature Information:
Modify existing information and add new information for a Septic Tank and Building.
- Moving Features:
Overview of editing Feature Geometry. Use Feature Editing Options to Move and the Building. Use snapping when moving the Building.
- Rotate Features:
Use Feature Editing Options to Rotate the Building.
- Modify Features:
Use the Scale and Edit Vertex options to change the shape of a feature.
Add/Update Feature Information
Modifying information about a component can include updating components that are both mapped and not mapped. When a component is not mapped it can only be accessed and updated using the System point and a System Form.
Note that all events, such as O&M events, can only be accessed and updated using the System point and System Form.
When component is mapped, you can select either the System point or the mapped component to modify information about the component.
1.0 To modify or add information to an existing feature, start by selecting the corresponding feature (Septic Tank) or the System point.
For this example select the Septic Tank and open the corresponding Form by selecting 'Show Form' in the Information Window.
Note that a Septic Tank may not be mapped, but may be added to a System point as a Table Record. To edit a Septic Tank, or other Table Record, select the System point and open a Form (System Information) that contains the Table Record that you want to edit.
1.1 Next, select 'Edit' to start an edit session and update or add the following information:
Label: 1500 G
Effluent Filter: Yes
Risers: Yes
Capacity Gallons: 1500
Status: Finalized
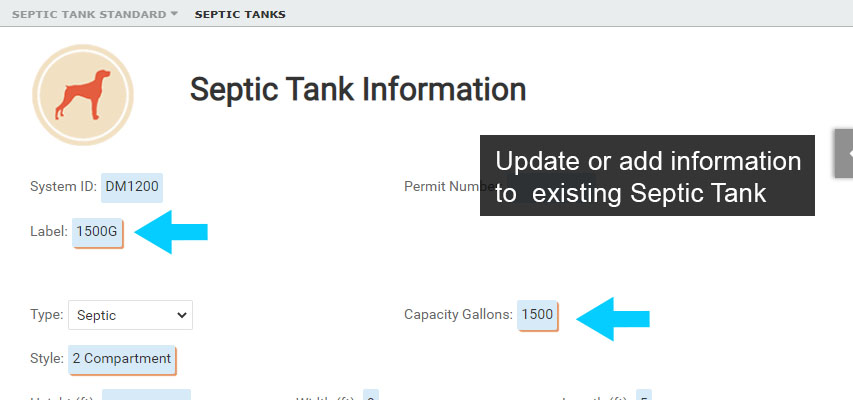
Edit Septic Tank Information
1.2 To save your edits, select 'Apply' and then 'Close' to end the edit session.
1.3 Next, you will update the Drain Field, but you will use the System point to make the update.
Select the System point and open the Form. Make sure the active Form is the System Information Form.
Select 'Edit' and scroll down to the Drain Field.
1.4 Modify the Drain Field Type to be a Gravity Mound and change the Status to Active.
Select 'Apply' to save the edits and select 'Close' to end the edit session.
Note that if the Septic Tank, Drain Field, Building or Soil Borings were added to a System point without mapping them, the only way to edit those 'table records' is to access and update them using the System point and System Form.
Moving Features
2.0 Now that we have worked through updating information about a feature, let's look at editing a mapped feature.
Editing a mapped feature can include moving, rotating, modifying the shape/size and deleting a feature. Deleting both mapped features and unmapped features in the next section.
To edit a mapped feature, a feature must first be selected, so start by selecting the Building.
2.1 Selecting the Building will open the Information Window, the Edit Features menu and at times the Building Form. If a Form opens, select the chevron to collapse/close the Form and expose the Edit Features menu.
Toggle on the 'Enable deletion/geometry editing' option located at the bottom of the Edit Features menu to start editing.
Once editing is enabled, the 'Feature Editing Options' window will appear on the map, which offers options for editing the position, rotation or shape of the selected Building.
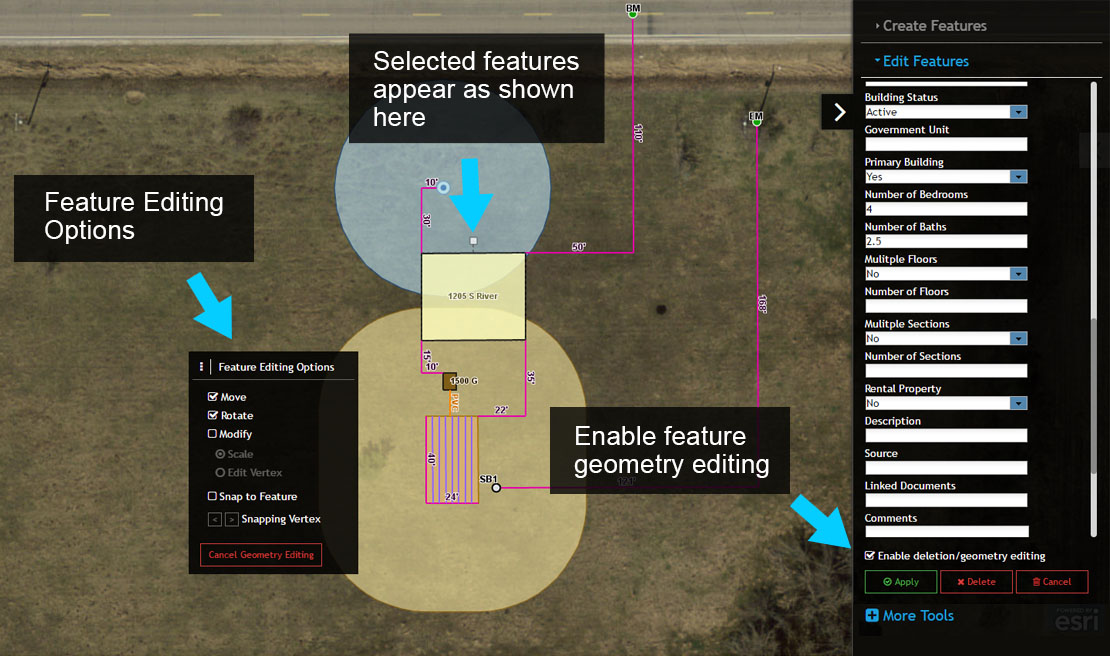
Edit Features
The ‘Feature Editing Options' menu provides options for performing edits to a mapped feature. By default, the 'Move' and 'Rotate' options are enabled. Toggle on 'Modify' to 'Scale' a feature or 'Edit Vertex' of a feature.
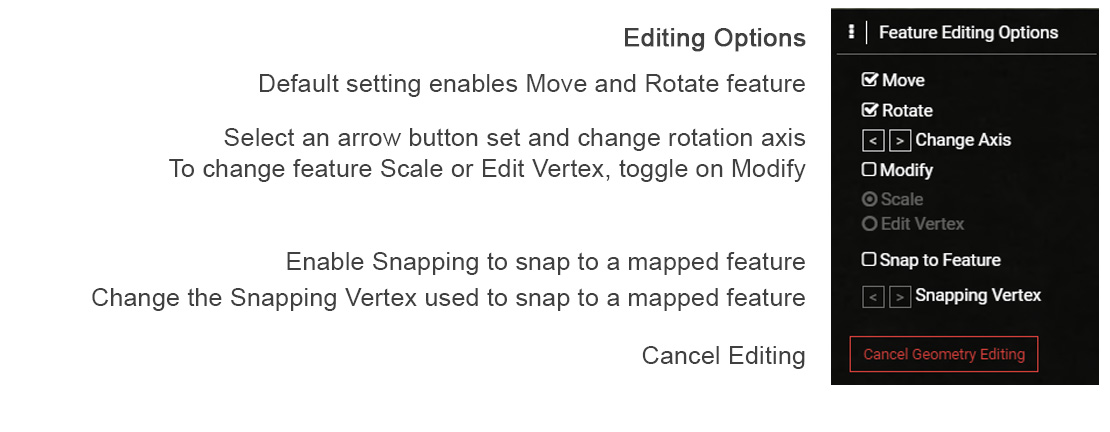
Feature Editing Options
2.2 The first editing tools you will use are the move and rotate tools.
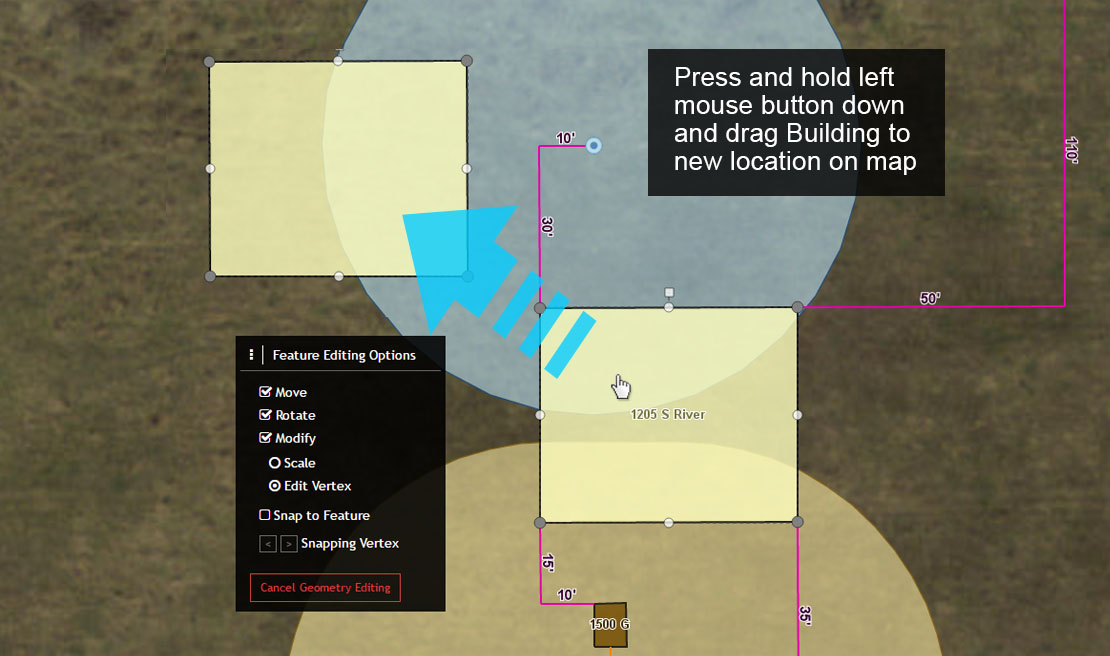
To get started move the cursor over the Building - the cursor will change to a hand pointer.
2.3 Next, with the cursor over the Building, press and hold the left mouse key and drag the Building to move it to a new location.
2.4 Complete the move by releasing the left mouse button and select 'Apply' on the Edit Features menu to save the edit.
IMPORTANT: a feature edit, like moving a feature, is not saved until the ‘Apply’ button is selected. If you do not want to commit an edit, select ‘Cancel Geometry Editing' on the Feature Editing Options menu.
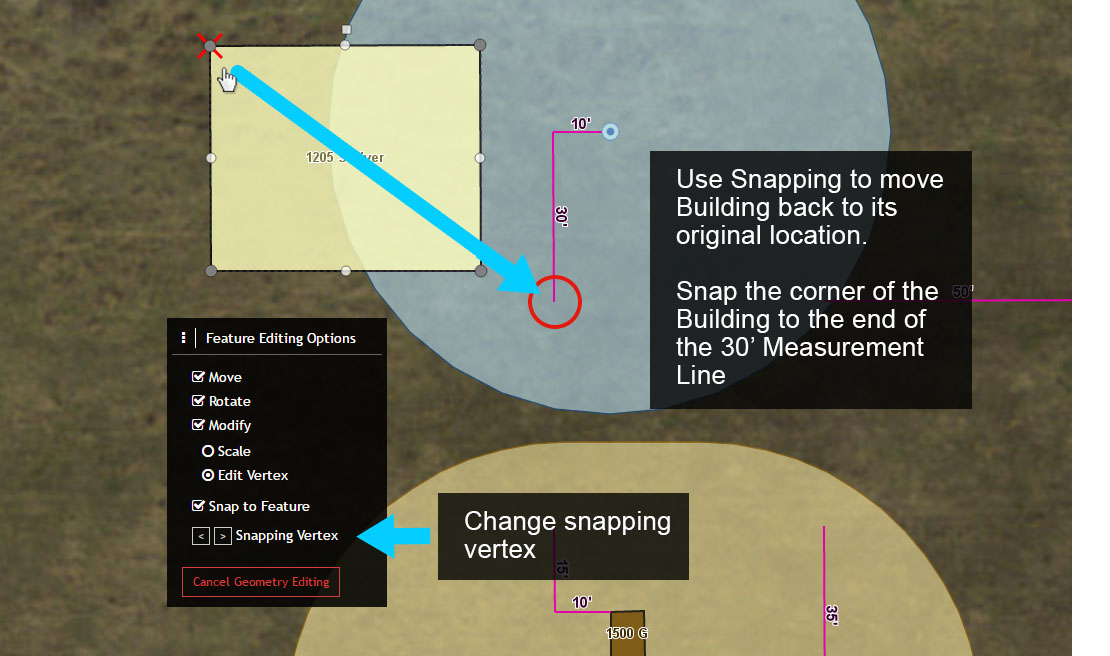
2.5 When moving a feature, you also have the option of ‘snapping’ the feature to another existing feature. You will use 'snapping' next to move the Building back to its original location.
Move Building Feature
2.6 Select the Building and toggle on 'Enable deletion/geometry editing' in the Edit Features menu.
Before you move the Building, enable 'Snap to Feature' in the Feature Editing Options window.
Notice the red X that appears on the northwest corner of the Building. This represents the vertex on the Building that will be used to 'snap' to another mapped feature, in this instance the 30' Measurement Line.
You can change the vertex that is used for snapping by using the Arrow Buttons next to the 'Snapping Vertex' in the Feature Editing Options window.
2.7 Move the Building to the south end of the 30' Measurement Line so that the red 'X' (vertex) snaps to the Measurement Line.
2.8 Select ‘Apply' from the Edit Features menu to save the edit. The Building should now be back in its original location.
Snap Building to Measurement Line
Rotate Features
3.0 With the Building back in its original location move the cursor over the Building and select it again.
3.1 Toggle on 'Enable deletion/geometry editing' from the Edit Features menu to start editing. In this example you will rotate the Building.
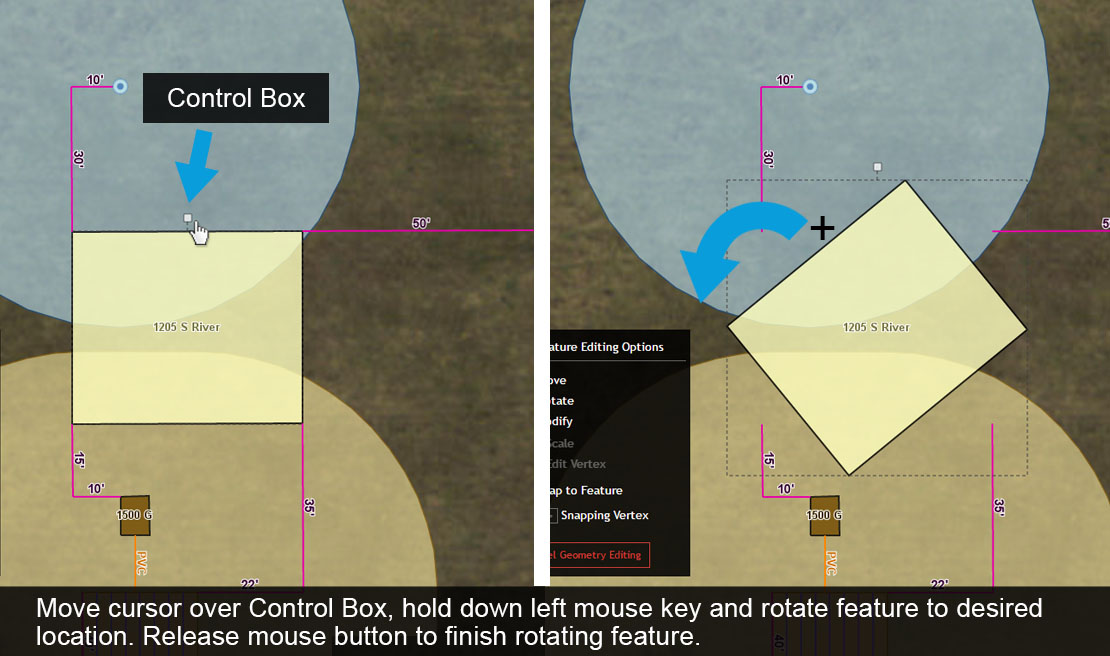
Now that editing is enabled, notice the White Square (Control Box) located above the Building. The 'Control Box' is used to rotate a feature.
3.2 Move the cursor over the Control Box, press and hold the left mouse button and move the cursor right or left to rotate the feature (see image). Release the mouse button to finish rotating the Building.
For now do not save the Rotate edits, instead select 'Cancel Geometry Editing' to retain the Building in its original location. Remember that edits to feature geometry are not saved until you select ‘Apply’.
Rotate Feature
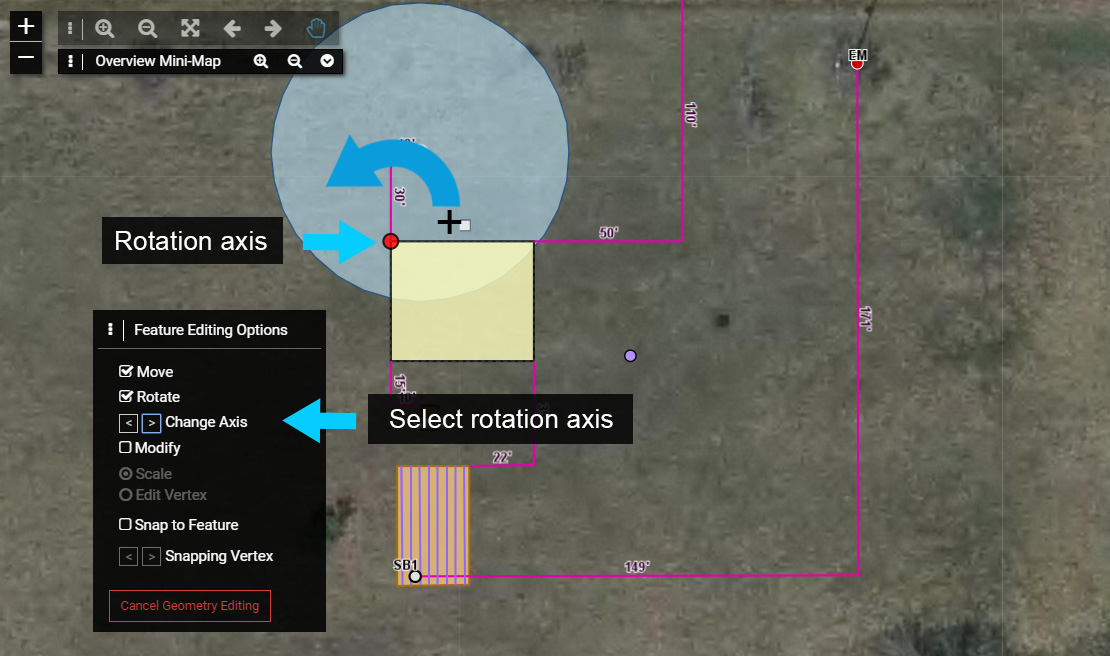
The Rotate tool by default rotates a feature around the centroid or middle of the feature.
You may want to rotate a feature around a axis that is a corner of the feature instead of the centroid.
3.3 Toggle on 'Enable deletion/geometry editing' from the Edit Features menu to start editing. You will rotate the Building again, but this time you will rotate it using a corner of the building as the rotation axis.
In the Feature Editing Options menu select one of the arrow buttons next to 'Change Axis'. This will place a red point on the rotation axis.
Make the northwest corner of the Building the rotation axis.
3.4 Next, rotate the Building and note how the rotation differs.
For now do not save the Rotate edits, instead select 'Cancel Geometry Editing' to retain the Building in its original location. Remember that edits to feature geometry are not saved until you select ‘Apply’.
Rotate Axis
Modify Features
4.0 The last type of feature edits involves modifying the shape of a feature. While this type of edit is not common, this example will cover the basics to familiarize you with the Modify options.
4.1 Select the Building and toggle on 'Enable deletion/geometry editing' from the Edit Features menu to start editing.
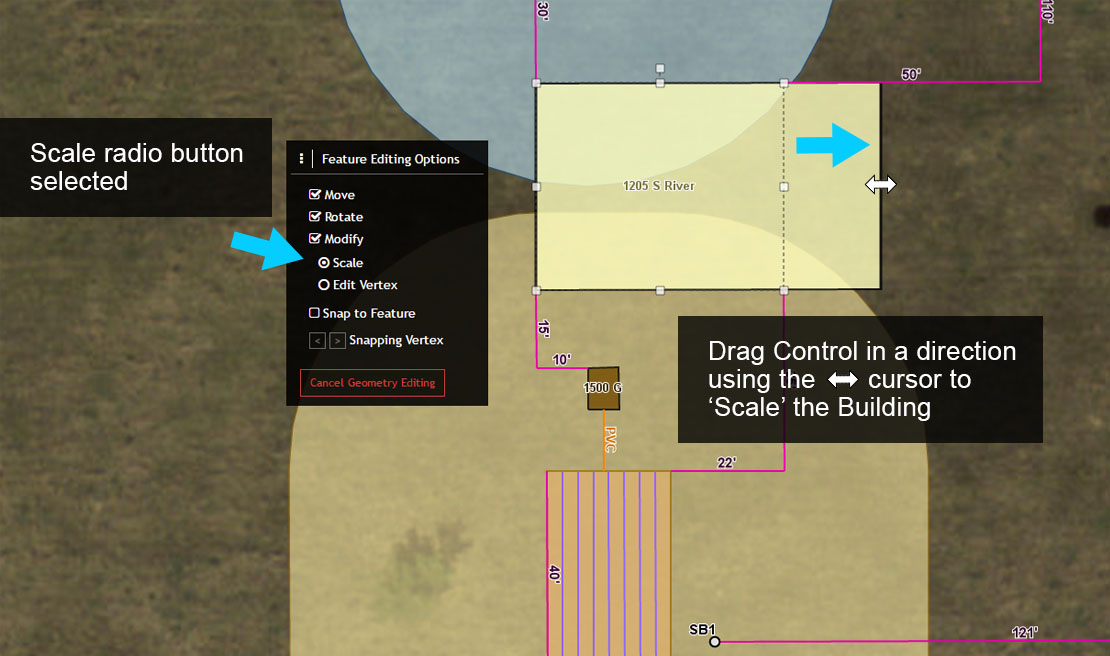
4.2 Toggle on the 'Modify' option and select the 'Scale' radio button from the Feature Editing Options window.
Notice that when you select Scale, additional White Squares (Controls) appear at the Building corners and mid-points between two corners. These Controls are used to Scale the feature, in this instance the Building.
4.3 Move the cursor over a Control. The cursor will change to a double arrow, which can be used to Scale the Building. To Scale a feature, press and hold the left mouse button and drag the feature in a direction.
Use multiple Controls to Scale the Building and become familiar with how it works. When you are finished experimenting select the Cancel Geometry Editing to retain the Building in its original location.
Scale Feature
4.4 Next, you will use the 'Edit Vertex' option to change the shape of the Building.
4.5 Select the Building and toggle on 'Enable deletion/geometry editing' from the Edit Features menu to start editing.
4.6 Toggle on the 'Modify' option and select the 'Edit Vertex' radio button from the Feature Editing Options window.
Notice that when you select Edit Vertex, Circles (Controls) appear at the Building corners (Gray) and mid-points (White) between two corners. These Controls are used to change the shape of a feature, in this instance the Building.
4.7 Move the cursor over a Control and drag the Control to a new location to change the shape of the Building. Note that when you use a White Control to change the shape, the result is that a new Gray Control and two (2) new White Controls are added. This allows you to refine the shape even further, adding more detail if desired.
Use multiple Controls to change the shape of the Building and become familiar with how it works. When you are finished experimenting select the Cancel Geometry Editing.
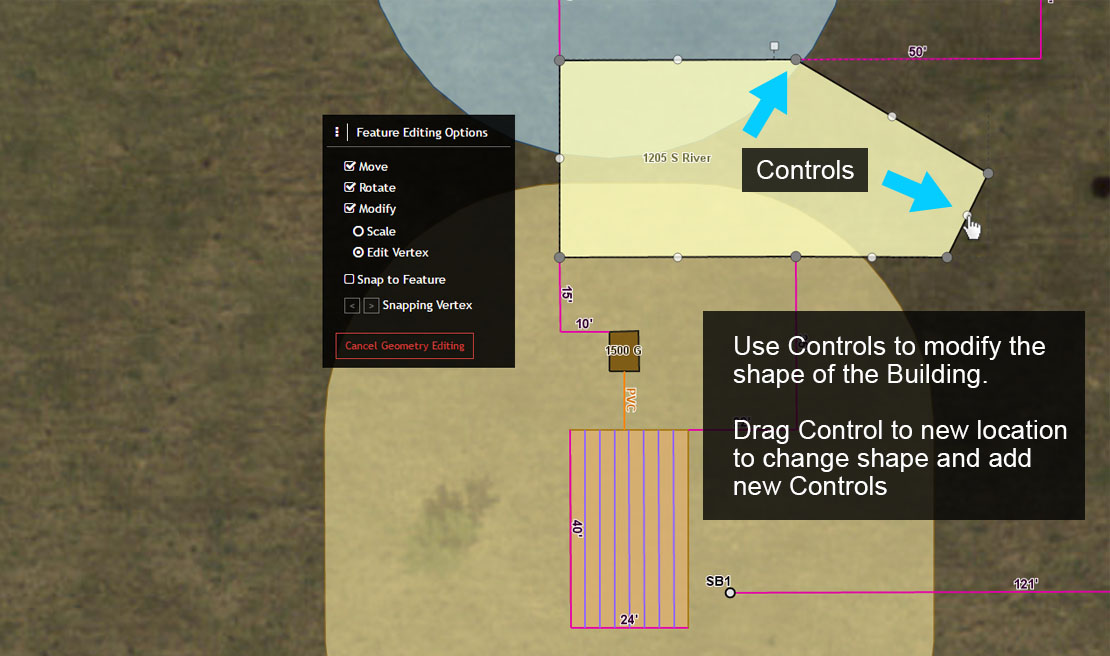
Modifying Feature Shape