1.0 Map Basics
Fetch Environmental Health (FetchEH) is a service on Amalgam's FetchGIS platform designed for Environmental Health workflows and data. The workspace is designed around the interactive map and complimented by a number of menus and side panes that provide functionality. This section introduces the various options available to navigate the map and manage map content.

FetchEH Workspace Overview
1.1 Map Navigation
Map Navigation is conducted using common navigation tools accessed from the Navigation Tool bar.
The Overview Map displays the current map extent (geographic coverage) as a rectangle. The Overview Map can be used to Pan the current map display by placing the cursor over the rectangle and dragging it to a new location in the Overview Map.
Important: Map Layers, such as parcels, are displayed based on zoom level. This is often referred to Level of Detail (LOD) and means that a Map Layer may not be visible until the map display is sufficiently zoomed in.
 Navigation Menu
1.2 Information Windows
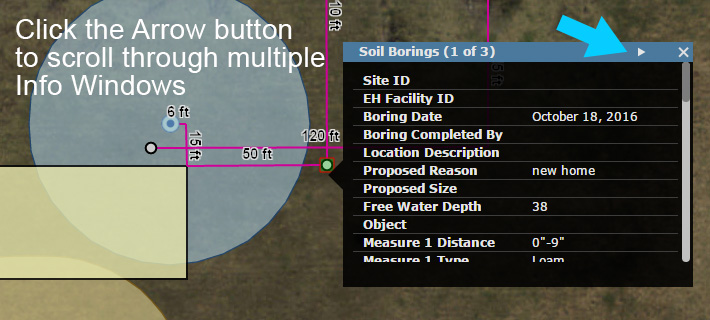
Information Windows are used to display information about map features like Septic Tanks, Drain Fields, Parcels and features displayed from other map services like Oil and Gas, Wetlands, Soils and more. To view the Information Window use the Pan Tool to click on any feature. The Information Window will open and display the attribute information about the feature that was clicked as displayed in the example:
Note that it is possible to select more than one feature based on the proximity of mapped features. Reference the Title bar on the Information Window to identify the current feature displayed in the Information Window.
In the image there are multiple layers overlapping with the Information Window showing the Soil Borings (1 of 3). The (1 of 3) indicates that there are three (3) features that have been selected. Use the Arrow button on the Title bar to scroll to the other selected features and open their corresponding Information Window.
 Infomation Window
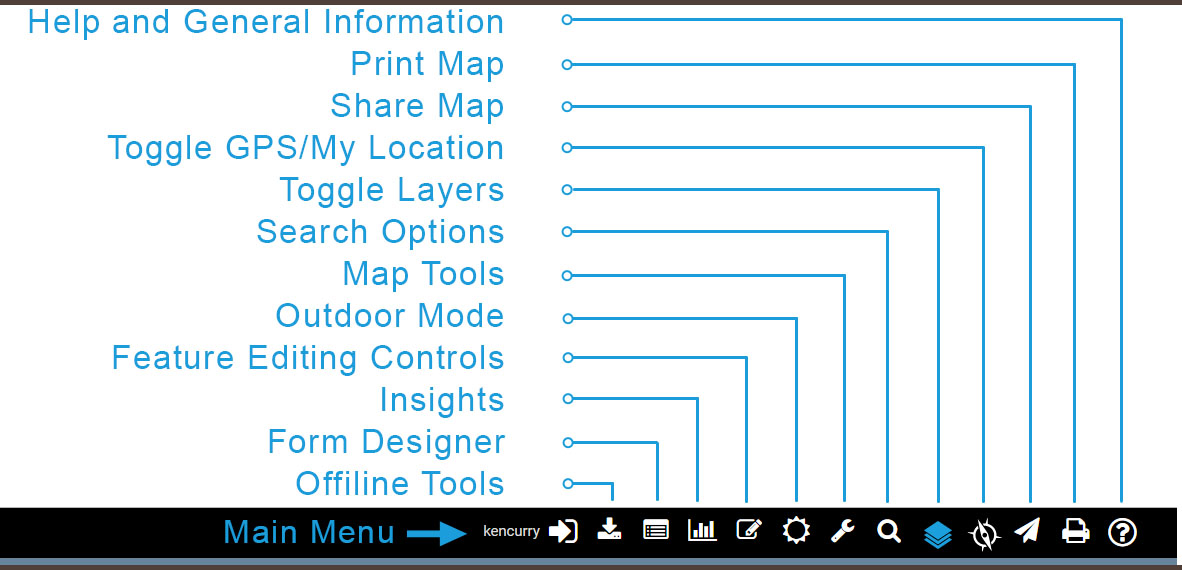
1.3 Main Menu Bar
The Main Menu Bar (see below) provides access to the tools available in FetchEH. Selecting an option on the Main Menu bar will often open additional menus, which are displayed in the side pane or as new windows in the application.
Options available on the Main Menu are described below:
Prepare To Go Offline - Used for mapping in Offline mode (see Field Preparation for more on creating a map tile cache and working Offline).
Form Designer - Open the Form Designer to create, modify and manage Forms.
Insights - Access Insights tools to build and apply Visualizations, Filters and Reports to better understand your data.
Feature Editing Controls - Access tools to map and edit onsite wastewater systems and wells.
Outdoor Mode - Change the contrast of the workspace to enhance display in outdoor conditions where bright light can negatively impact the ability to view the workspace.
Map Tools - Provides access to a number of tools used to interact with the map display including Measure tools, Graphic Markup tools and Layer Swipe.
Search - Access search options for finding systems, permits, parcels, road intersections and more where available.
Toggle Layers - Displays the Layer Groups and Map Layers available in the EH Application including local GIS layers and layers from federal and state sources. Control visibility for Layer Groups and Layers and view symbology for each Layer.
Toggle GPS - Displays the current location of a user on the map when GPS is enabled on their mobile device. Note, positional accuracy is determined by the internal (tablet) or external GPS and not FetchEH.
Share Map - Provides a Tiny URL map link that can be used to share a map via email, social media or other option.
Print - Opens the Printing options for creating custom maps that can be printed and/or saved as a PDF.
Help - Access to Help documentation and General Information.
Main Menu Options
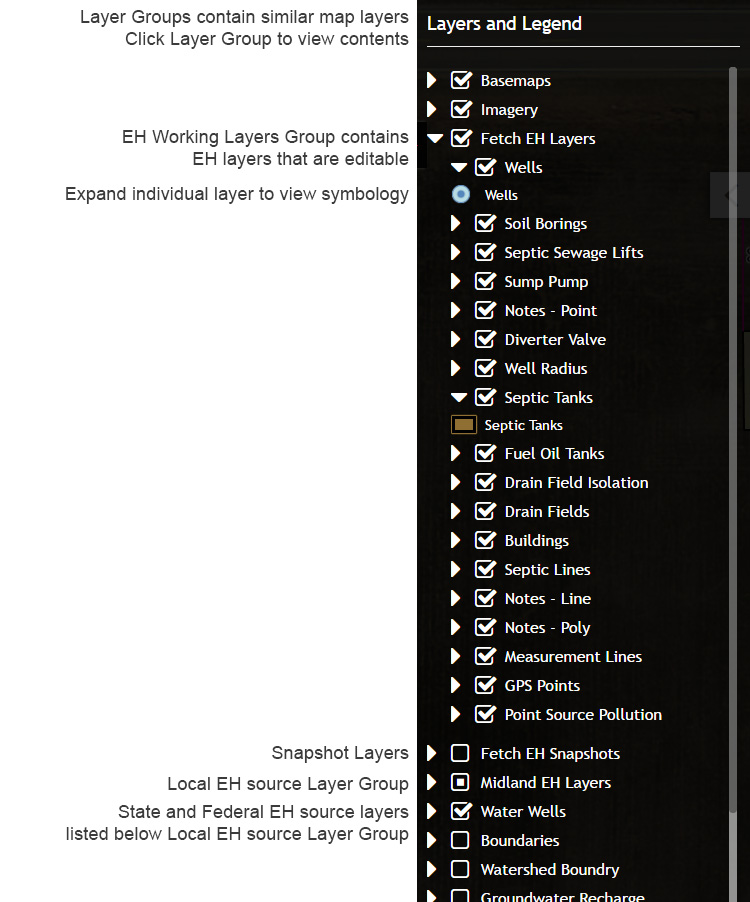
1.4 Map Layers
Control layer visibility and view layer symbology by selecting the Toggle Layers option on the Main Menu. Map layers are presented as individual layers or managed in Layer Groups such as Imagery or Fetch EH Layers. To view the layers in a Layer Group click the chevron next to the Layer Group name.
Layer Visibility - Map Layer visibility is controlled by toggling on/off the check box displayed to the left of the Layer name. Toggling the visibility on/off for a Layer Group will turn on/off all Layers in the Layer Group.
Layer Symbology - To view the Legend/Symbology for a Layer click the chevron displayed to the left of the check box.
Fetch EH Layers Group - Contains all EH working layers that can be mapped and edited in the application.
Fetch EH Snapshot Group - Contains all EH Snapshot layers that have been created.
'DEPARTMENT NAME' EH Layers Group - Contains local EH layers such as parcels, landfills or other GIS data added to the application.
Research Layers - Map layers available from State, Federal and other non-local resources are listed individually below the 'DEPARTMENT NAME' EH Layers Group.
 Toggle Layers
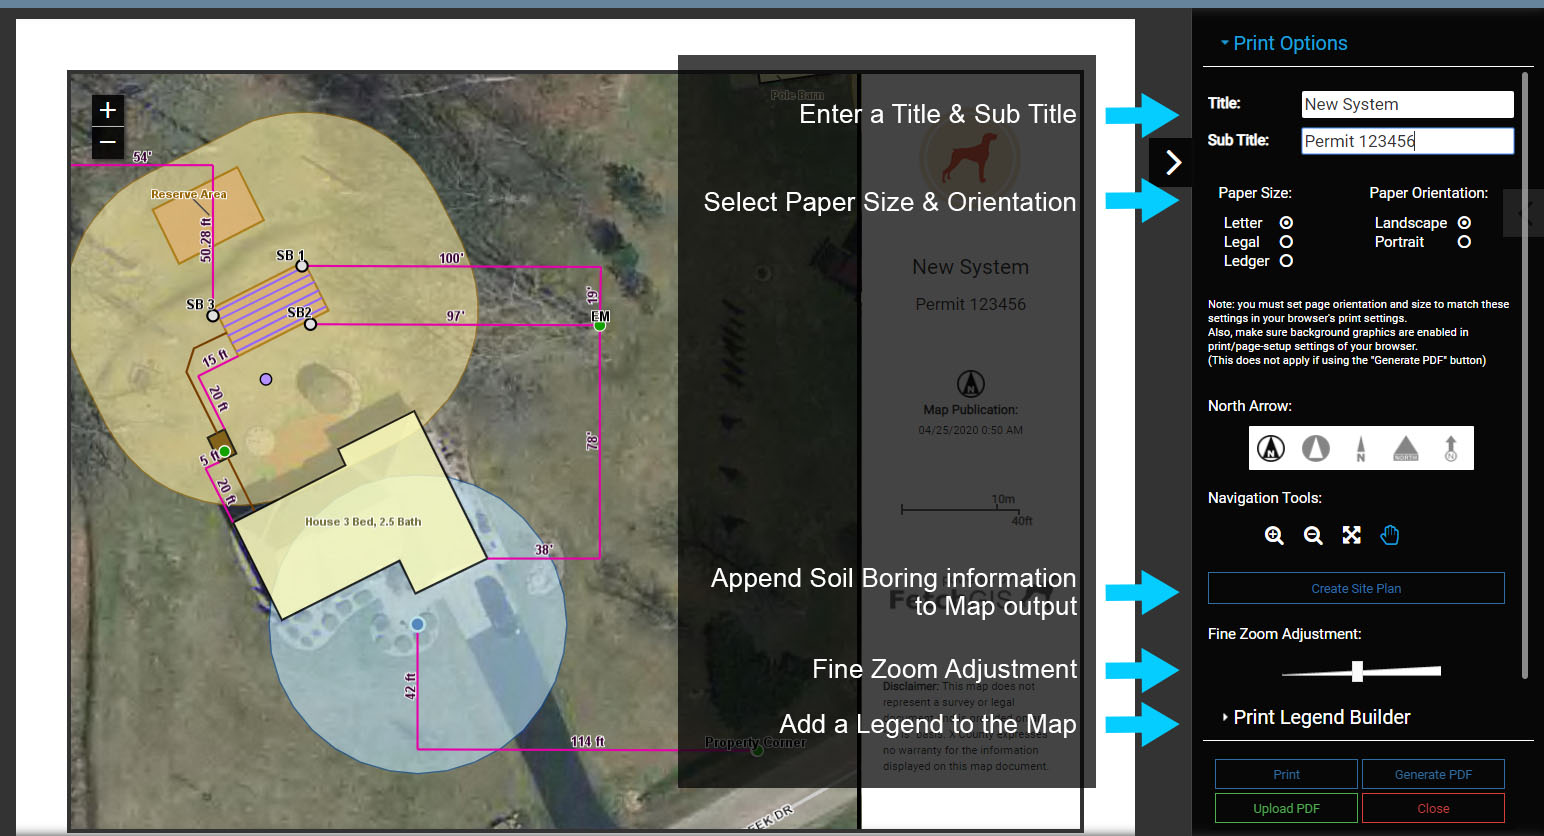
1.5 Printing
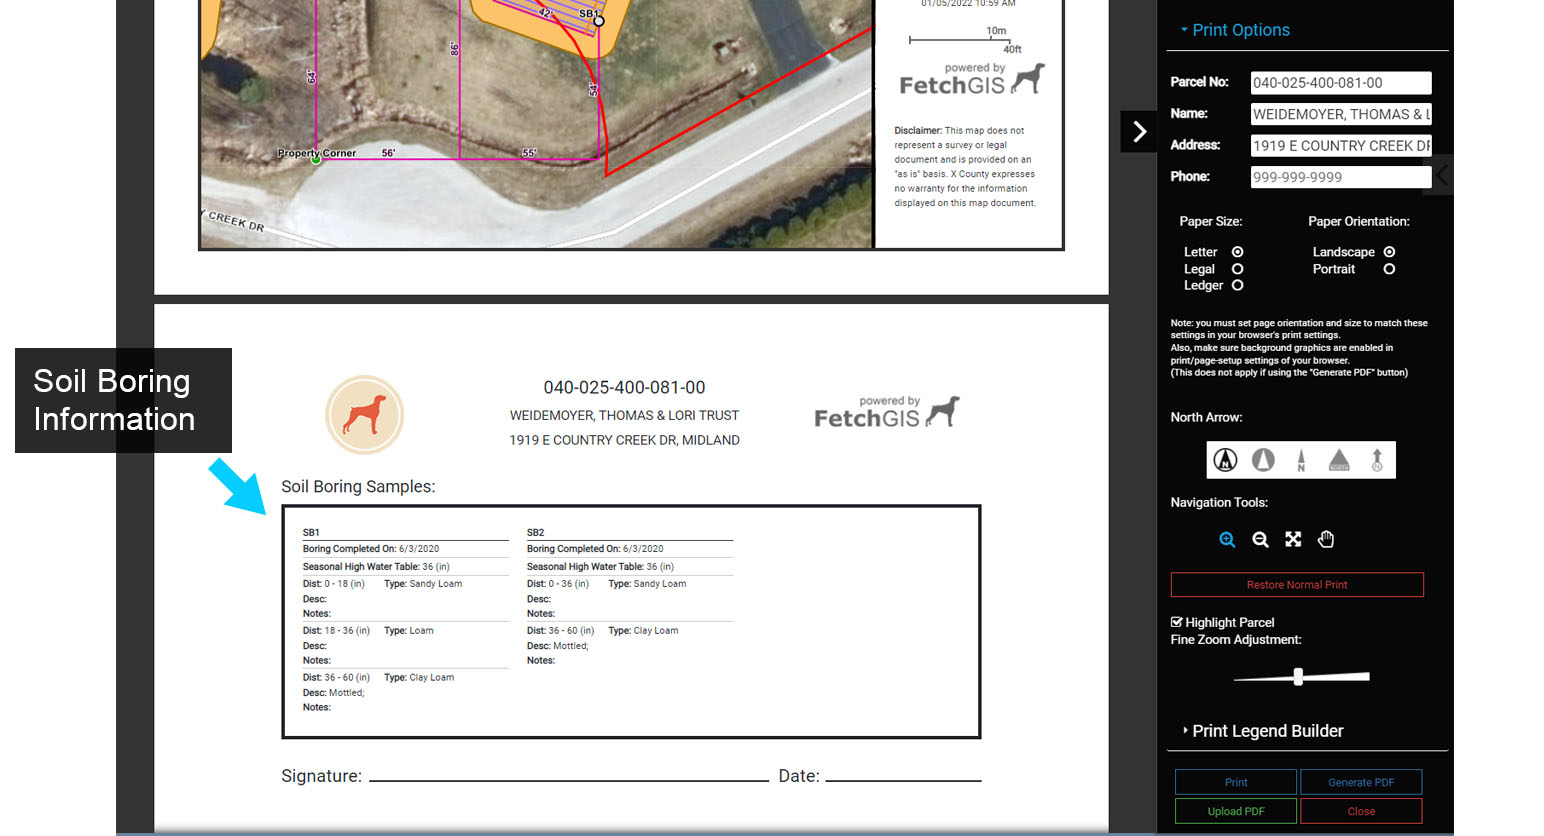
Printing tools provide options to generate output in the form of a hardcopy print or to save a PDF. The 'Create Site Plan' option can also be used to add Soil Boring information to the second page of any print. Where available, the Site Plan will also include the Parcel Number, Owner Name and Parcel Address for the site. Follow the steps below to create a Site Plan.
1 From the Main Menu select the 'Activate Printing Mode' button. This will open the Printing menu options.

Below is an overview of the Print options.
Print Menu Overview
2 Select the 'Print Legend Builder to add a Legend to the Map. Toggle on Map Layers that will be added to the Legend and the Legend will automatically be constructed on the map. Note that the Legend can be moved to a new location by dragging it with the cursor.
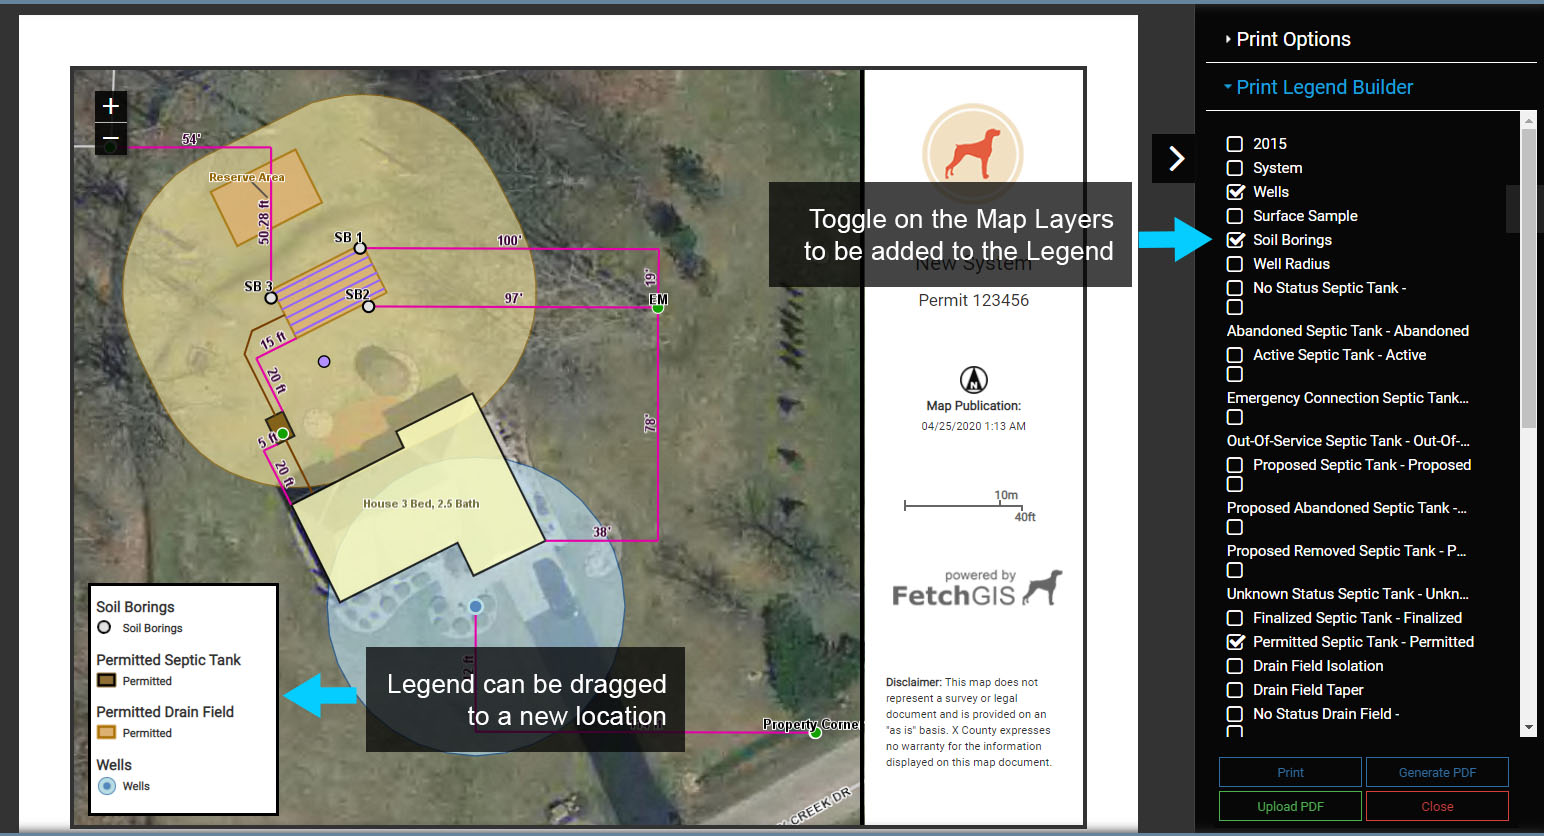
Adding a Legend
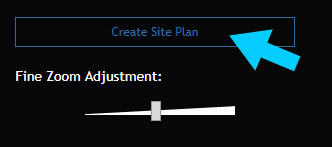
3 The default option for Printing is a standard map. To add additional formatting features and Soil Borings to the output select the 'Create Site Plan' option.
4 When available, the Site Plan will be auto populated with the Parcel Number, Owner Name and Parcel Address. Each of these can be manually entered or modified using the text entry boxes in the Print Options menu located in the side pane.
Note that a Site Plan PDF or print is two (2) pages, with the second page containing the Soil Boring information.
Soil Borings will only be added to the Site Plan if they are visible in the map display. Also note that the map displayed in the Site Plan is interactive, so it can be repositioned if required using Pan or Zoom.
If the site plan does not fit on the paper the 'Fine Zoom Adjustment' can be used to improve the fit of the site plan to paper.
Site Plan
Printing Forms
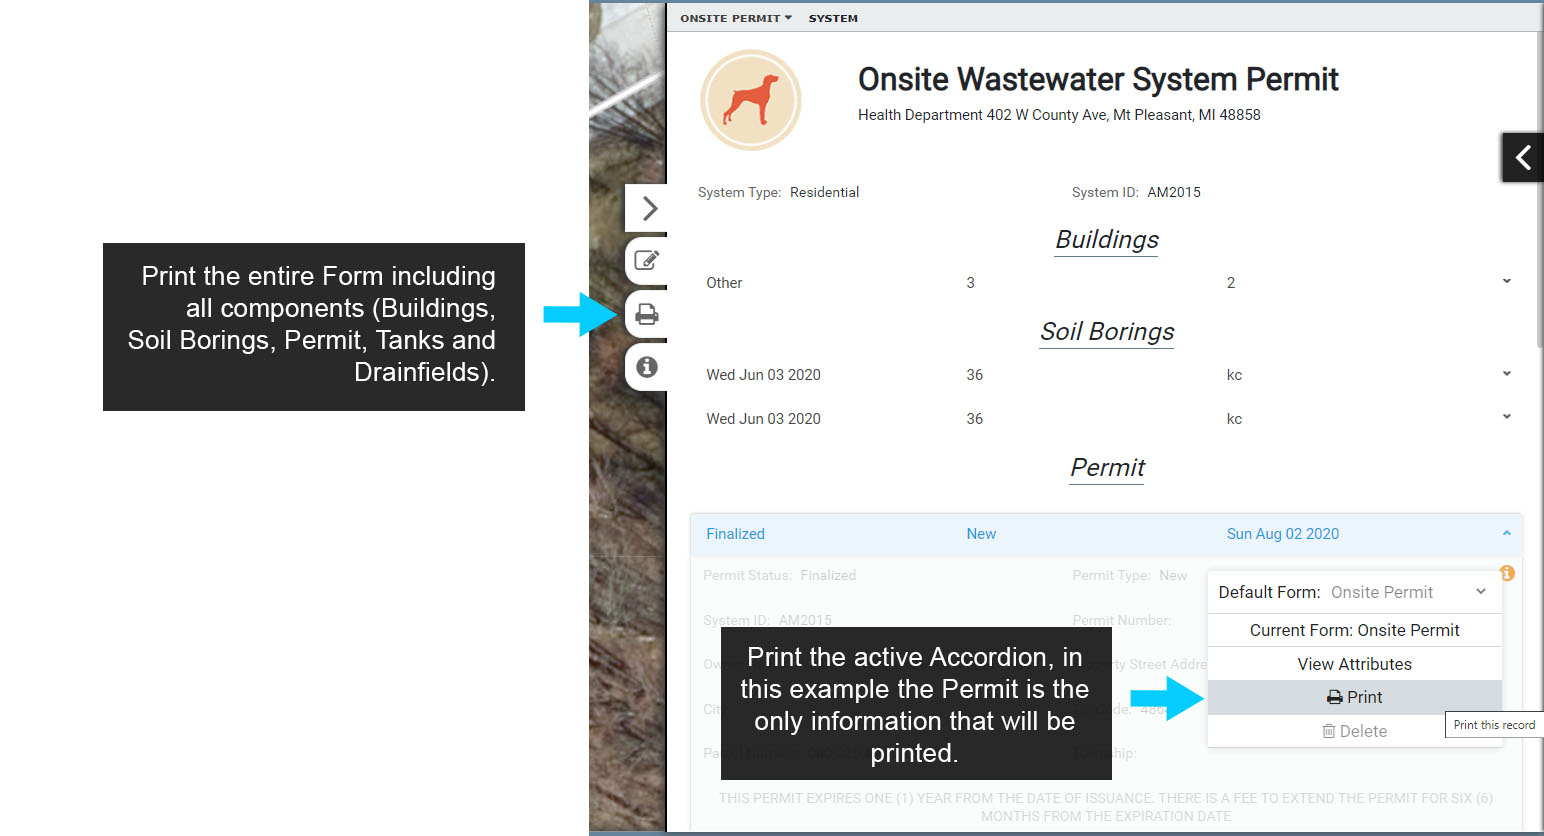
1 Forms are used for data collection and to provide output that can be saved as a PDF or printed.
To print a Form select a mapped feature, such as the System point, and select 'Show Form' to open the corresponding Form. In this example the System point is selected and the System Information Form is opened.
2 Next, use one of two Print options as described below:
Print Entire Form: to print the entire Form, including any Linked Forms (Buildings, Soil Borings, Applications, Permits, Septic Tanks,etc.), use the Print button located on the side of the Form.
Print a Single Accordion: to print only a Linked Form select the Information Icon at the top right of any Accordion, then select Print. This option will only Print the parent Form information, in this example the System Type and System ID, and the Accordion, in this example the Permit.
Formatting & Printing Forms
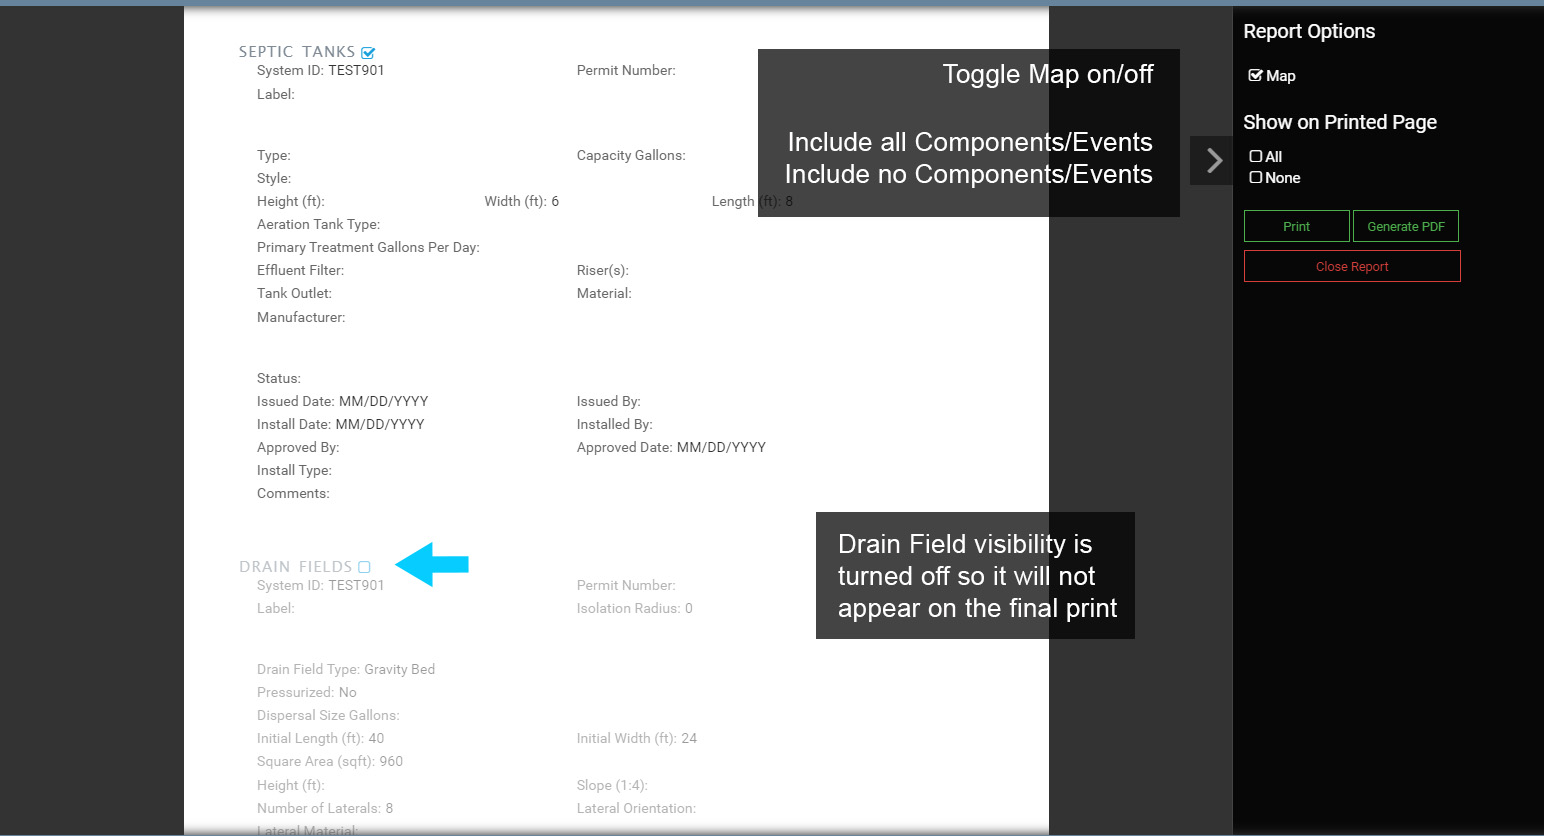
3 Once in the Print menu you still have the option to remove Accordions that you do not want to print. Each Component or Event listed on the Form has a visibility control when in Print mode that can be toggled on/off.
When the visibility of an Accordion is toggled off, the corresponding Component or Event will be grayed out, indicating it will not show up in the final output.
Toggle the visibility on/off to see how it behaves. Also toggle the Map on/off and test the All and None controls to become familiar with how they work.
4 Finally, select 'Generate PDF' to create output for the Form.
Formatting & Printing Forms