4.6 Insights Report
An Insights Report is very similar to the Insight Filter in that a Query Statement(s) is constructed to evaluate a specific question or subset of data. The difference between the two is that an Insights Report results in different output, including on the map and in the form of reporting.
Generally, an Insights Report is used to create output in the form of a report that can be printed or saved as a PDF. The Insights Report includes a map, summary, charting and a list of matching records.
Exercise Menu
Use the menu below to jump to a specific task/workflow.
- Creating a Filter for Insights Report:
Create a Filter using a Query Statement(s) and then save the Filter.
- Execute a Filter and create an Insights Report.
Creating a Filter for an Insights Report
An Insights Report, or sometimes referred to as a Query Report, is very similar to a Filter in that a Query statement(s) is constructed to evaluate a specific question or subset of data. The difference between the two is that an Insights Report results in different output, including on the map and in the form of reporting.
1.0 In the Insights side pane, select the 'Report' button to open the 'Insights Report' menu.
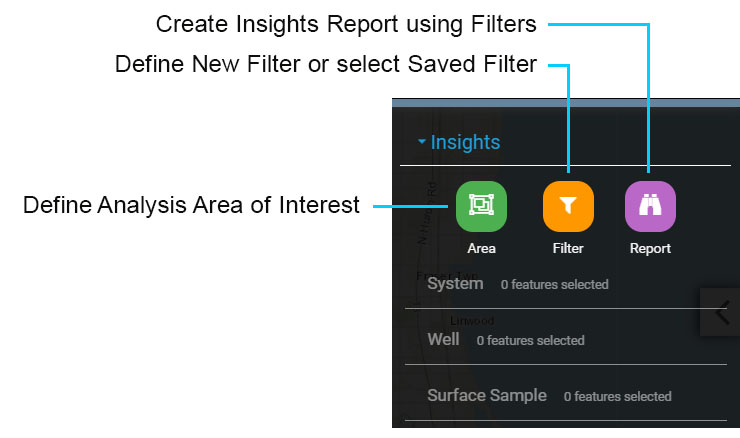
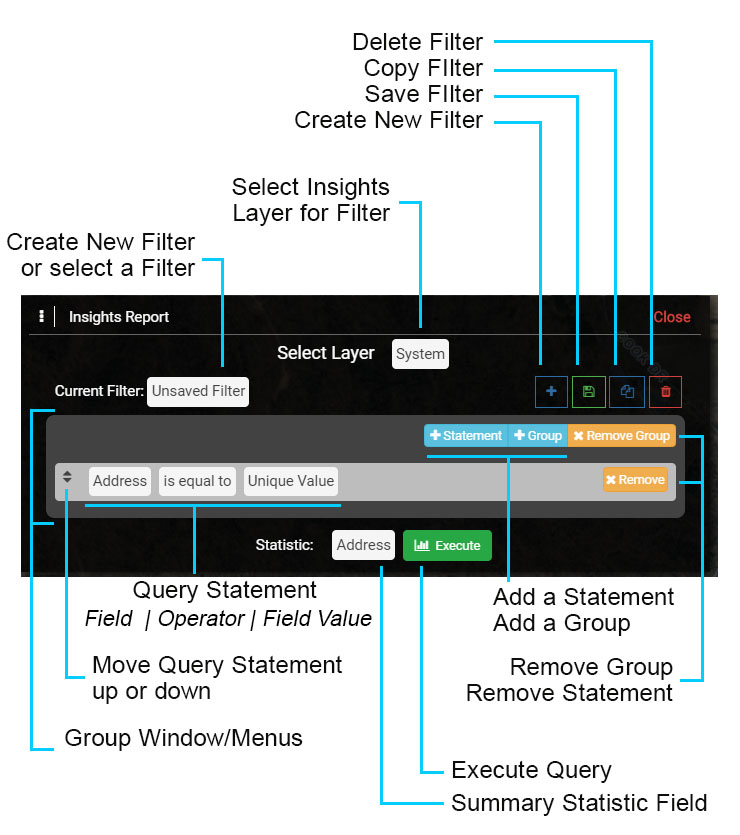
The Insights Report menu is similar to the Insights Filter menu and is used to select an existing Filter or to create a new Filter. Filters used for Insights Reports are constructed using at least one Query Statement, but may include many Query Statements organized into Groups. The Insights Report menu is described below:
Select Layer: before creating or selecting a Filter, select the Layer that the Filter will be applied to.
Current Filter: default setting is 'Unsaved Filter', which is used to create a new Filter. To select an existing Filter select the 'Unsaved Filter' text and a menu will appear displaying any saved Filters.
Group Window: the dark gray window holds the Query Statement(s) that make up a Group. The options (+Statement, +Group, x Remove Group) are used to add new Query Statements to a Group, add a New Group and Remove the Group.
Query Statement: the light gray window is used to construct a Query Statement and includes selecting a Field - Operator - Field Value. Select the text in each cell to open the corresponding menu. The 'x Remove' button removes the corresponding Query Statement.
Execute : used to execute or run a Filter, resulting in matching System points being displayed on the map and a report being displayed.
Statistics : select a Field that will be used to generate Summary Statistics in the Insights Report.
Delete Filter: used to delete the current Filter.
Copy Filter: used to copy an existing Filter and save it as a new Filter, where it can be modified.
Save Filter: used to save a newly created Filter or an existing Filter that is modified.
Create Filter: used to create a new Filter when the Current Filter is set to an existing or saved Filter.
Note that any saved Filter can be used for the Insights Report and Insights Filter and visa versa.
Insights Report Menu
1.1 Use the Insights Report menu to construct a Query Statement. Start by selecting 'System' as the Select Layer.
1.2 Make sure that the Current Filter is set to 'Unsaved Filter'. If it is set to something else, select the 'Create New Filter' button.
1.3 In the Query Statement, select the Field cell ('Address') and scroll down the menu to located Septic Tank, then select 'Capacity Gallons' for the Field.
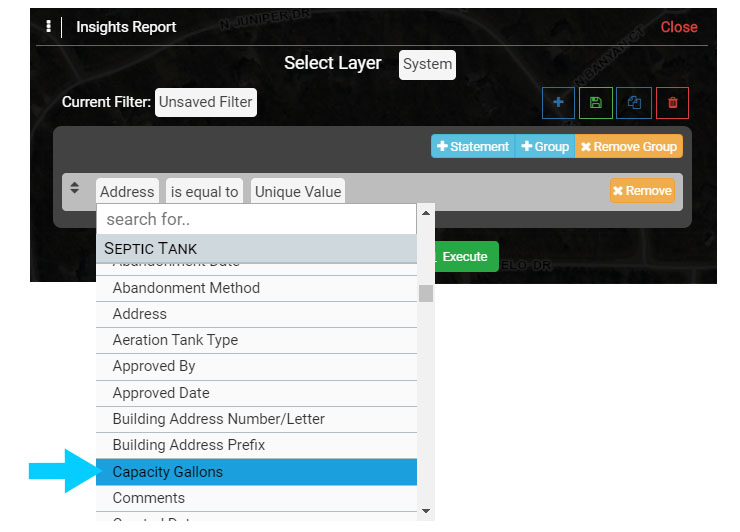
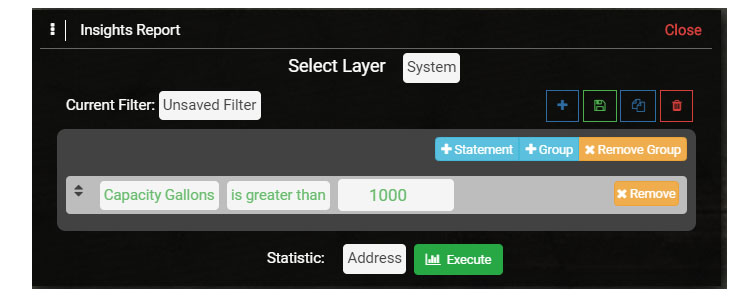
1.4 In the Operator cell select 'is greater than' and enter '1000' in the Value cell.
Once you have entered the Value the text in the Query Statement will turn green. The finished Query Statement should appear as displayed below.
1.5 Add another Query Statement by selecting the '+ Statement' button.
Note there is an additional And/Or menu that is used to determine how the next Query Statement is applied in relation to the first Query Statement. Select 'And' for this example.
1.5 Complete the second Query Statement where the Field is set to Septic Tanks - Install Date (or other Date Field if present).
Set the Operator to be 'is greater than' and the Value to be 12/31/1999 (or other Date that works with your data).
If your Date Fields have not been populated, use the Created Date or Last Edited Date to simulate the effect of using a Date.

1.6 You could continue to add Query Statements, including creating a new Group(s) to ask more complex questions. For example, the new Group could include finding specific Drain Field characteristics, such as Type or Pressurized.
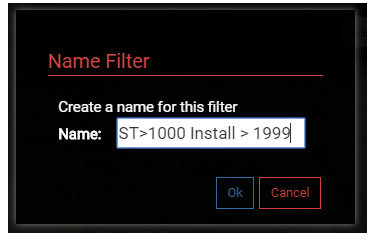
For now save the Filter by selecting the Save button in the Filter menu. Name the filter 'ST Capacity > 1000' and select OK to save it.
Note that after you save the Filter the Current Filter is 'ST>1000 Install>1999'. If you wanted to create another new Filter, you would select the Create New Filter button.
1.7 Next you will create a new Filter using the 'ST>1000 Install>1999' Filter as a template.
Make sure the Current Filter is set to 'ST>1000 Install>1999' and then select the 'Copy Filter' button. This will create an exact copy of the 'ST>1000 Install>1999' that can be modified.
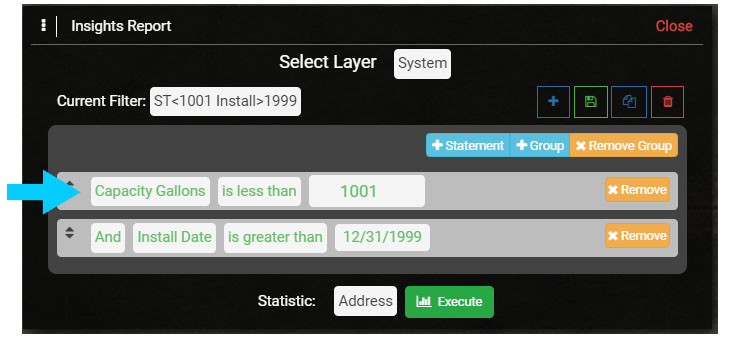
Save the copied Filter as 'ST<1001 Install>1999'.
1.8 Once the Filter is saved, modify the first Query Statement by changing the Operator to 'is less than' and the Value to '1001' as shown in the image below.
Now that you have created two Filters for the Insights Report they can be used to create a Query Report. Note that the Filters created in the Insights Report will also be available in the Insights Filter menu and for any Visualizations.
Executing a Query & Query Report
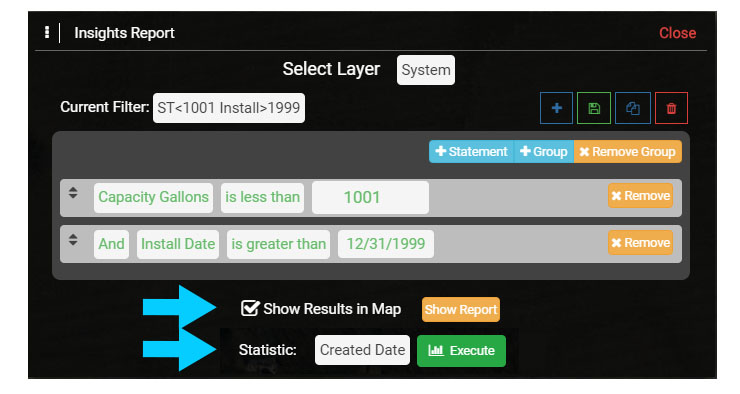
2.0 Before executing the Insights Report, make sure the 'Show Results in Map' is toggle on. If you do not want to show the results in the map toggle this option off.
Select 'Created Date' for the Statistics, which will summarize the matching results by the the date the Septic Tanks were created.
2.1 Select Execute to run the Query.
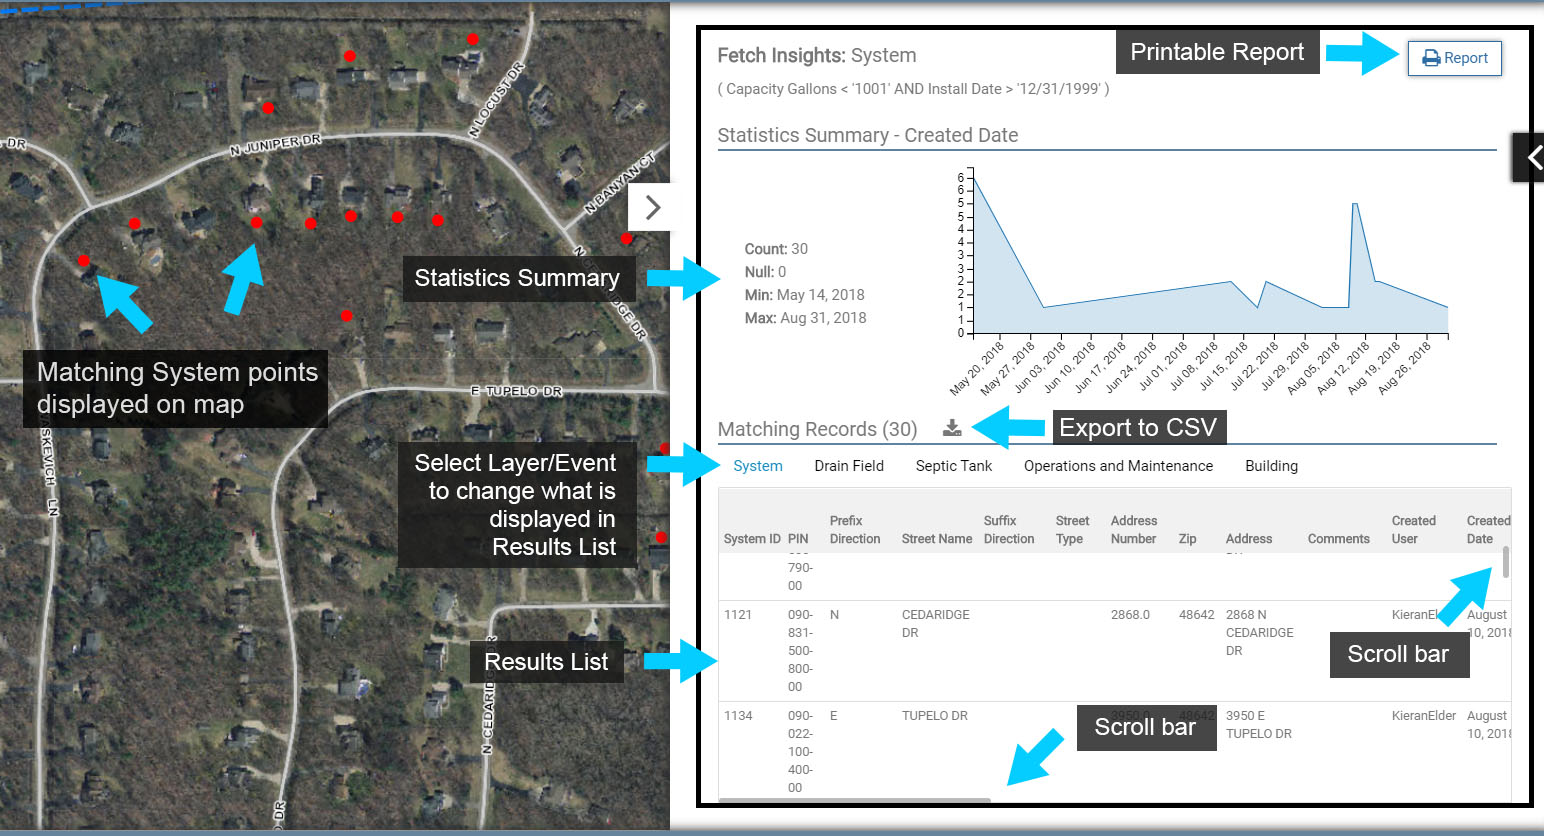
Executing a Query will open the Query Results and display the matching System points on the map as red circles. Below is an overview of the Query Results:
Report: select to create output that can be printed or saved as a PDF.
Statistics Summary: provides a summary of Statistics field values selected in the Query statement. 'Null' represents instances where no value has been entered for a record.
Chart: displays Statistic values using a bar chart or line chart. Line charts are used for Dates and hold 365 data points (dates). If 'Null' values are present, the 365 data points will span more than one year.
Layer/Event: used to browse Layers/Events in the Results List. Because system components and events are managed under a System point, information about any system component or event managed under a System point that matches the Query can be displayed in the Results List.
In this example, System points that have a Septic Tank with a Capacity Gallons less than 1001 gallons and were installed prior to 2000 are selected. So any other system component/event managed under those matching System points can be displayed in the Results List.
The selected Layer/Event is also what will be used in any Insights Report and Export.
Export: export the Results List to a CSV file. Note that the export will include information for the selected Layer/Event. For example, if Drain Field is the selected Layer/Event, only Drain Field information will be exported.
Results List: displays information for the selected Layer/Event. Use the scroll bars located at the bottom and right side of the Results List to view all Fields and records.
Note that when the System is the selected Layer, you can select a record in the list and the map will zoom to that location.
Query Results
2.2 Select the system components and events in the Layer/Event if they are available. Note how the Results List is updated to reflect the selected system component or event.
Use the scroll bars to view all of the fields and records in the Results List.
2.3 Create two Exports, one for Drain Fields and the other for Septic Tanks. Note that data in the Export (fields, record values) will correspond to the selected system component/event in the Layer/Event.
2.4 Mouse over the chart and note that it is interactive, displaying the Field Value and Count.
2.5 Return to the Insights Report menu and select a new Field for 'Statistic'. Try using a Field with unique values, such as Type, Status or Created By.
Select 'Execute' to run the Query and update the Query Results, which will update the 'Statistics Summary'.
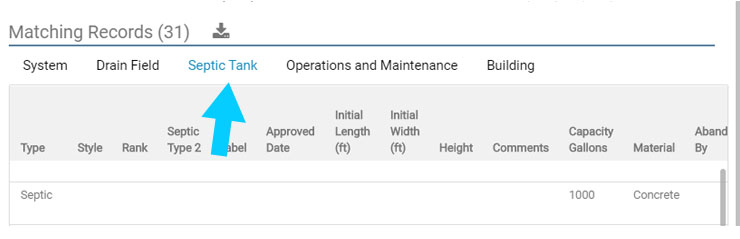
2.6 Next, create a printable report. Start by making Septic Tank the selected Layer/Event above the Results List, and the select 'Report'.
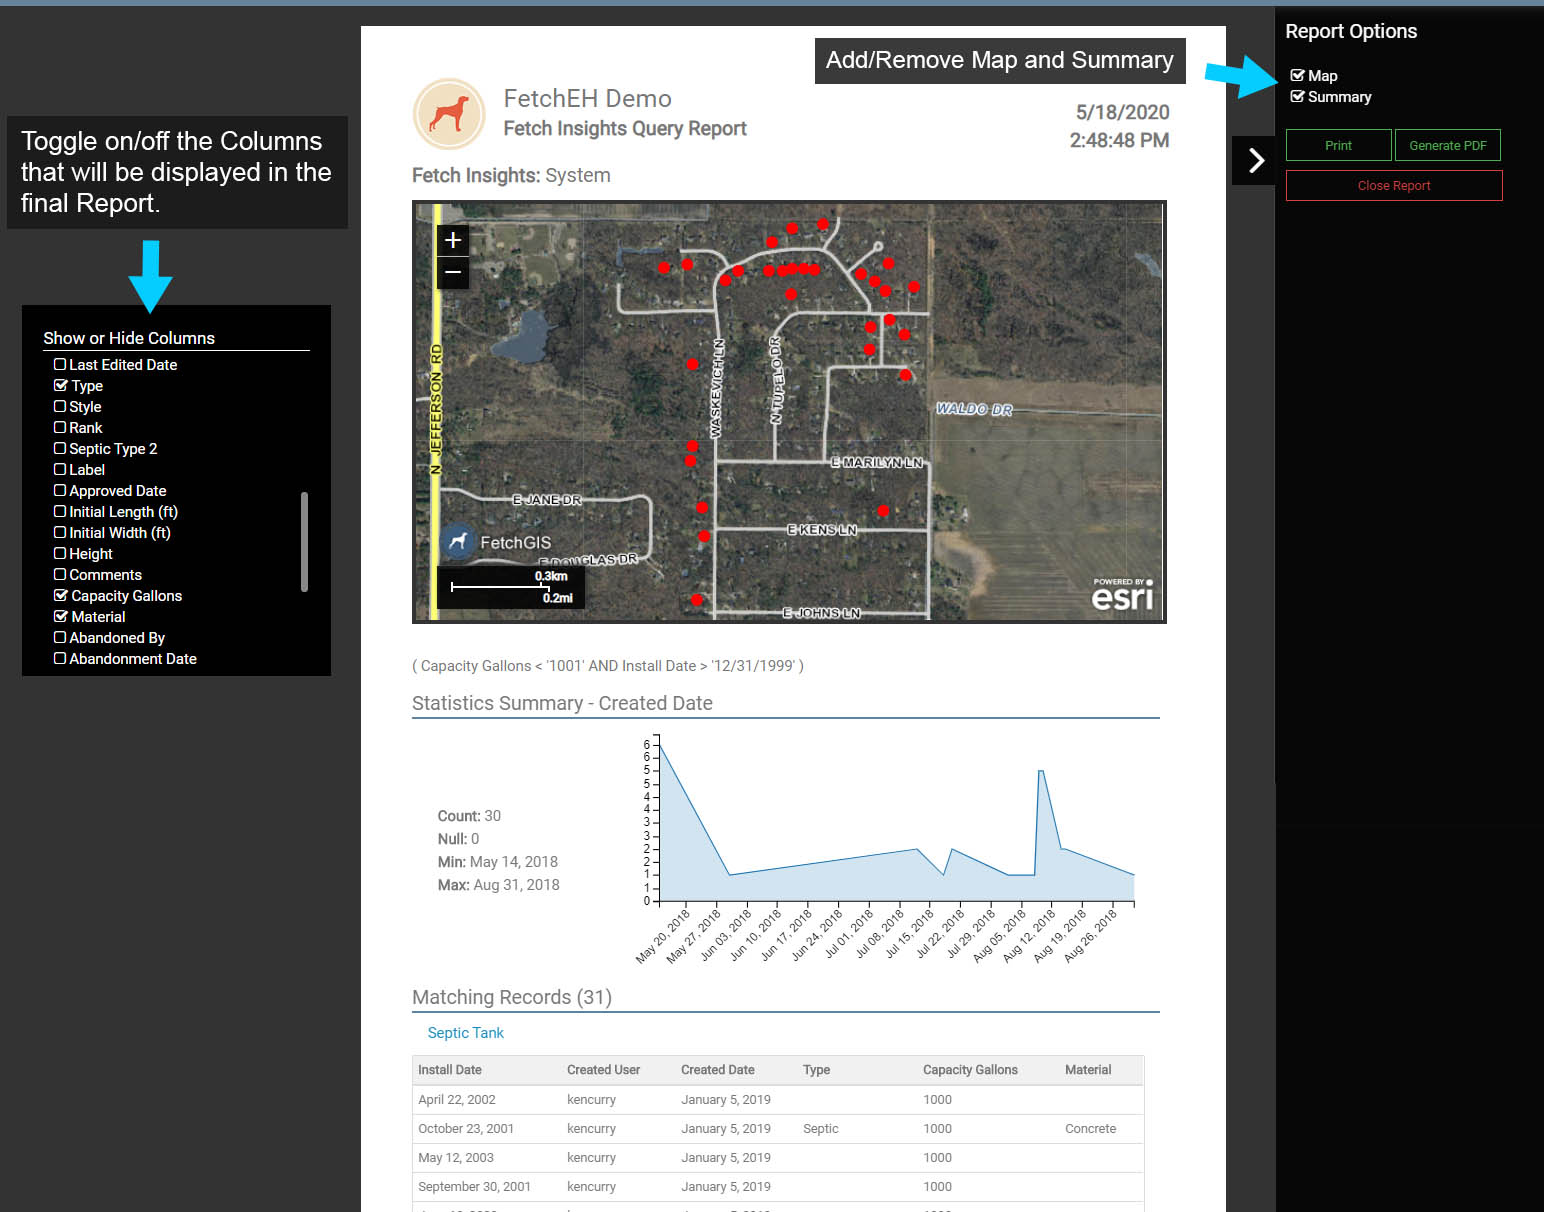
2.7 The Insights Report replicates what is displayed in the Query Results for print or PDF output.
Under 'Report Options' there is a control for the Map and the Summary. Toggle off the check box to remove either element from the final output.
2.8 Similar to controlling the Map and Summary, you can also control what Columns in the Results List will be used in the final output.
Toggle on the Columns that will be displayed in the final output using the 'Show or Hide Columns' menu. Note that the number of Columns is limited and not all Columns will fit on the page.
Query Report