4.3 Using Forms: Mapping Components, Data Entry and Editing
This section provides an overview of using Forms for clients transitioning to Form based workflows. This overview should be complimented by visiting Mapping/Data Collection Section. The Mapping/Data Collection Section has been revised (5/2020) to focus on Form based mapping and data collection workflows, and provides additional details and exercises.
Forms are used to view information about a System, print System information, and to enter information about System components (septic tank, disposal area, soil boring, etc.). Entering information about system components includes those components that are mapped and those that are added only as table records (not mapped), or for events like operations and maintenance.
Forms remove some of the functionality previously accessed in the Information Window, including the 'Add' or 'Edit' options, which were used to Add a new feature/table record or Edit and existing feature/table record.
Forms also remove the need to enter component information using the Edit Features menu. However, for mapped features only, the Edit Features menu can still be used to enter component information and more importantly, to edit mapped features, such as moving or rotating a feature.
The following provides an example of using Forms to add components and information to a System point. The example will review adding mapped components and adding components as tabular records (not mapped) to demonstrate how Forms are used.
Exercise Menu
Use the menu below to jump to a specific task/workflow.
- Map a new System point:
The System point is used to manage system information from a single feature on the map.
- Using a Form to Add System Information:
Overview of using a Form to add System information once a System point is mapped.
- Using a Form to Add System Components:
Overview of using a Form to add system components (septic tank, drain field, etc.) and information to a System.
- Editing/Deleting in a Form:
How to edit and delete system components and information using a Form.
Map a new System point
1.0 Mapping a System point is still the first step in created a new onsite system on the map. The System point is used as the primary management unit on the map to store related system components and events.
1.1 Select the Feature Editing Controls button on the Main Menu, and then select the System from the Create Features menu. This will open the the Create Features Side Pane menu.

1.2 Select System from the Create Feature menu and move the cursor to the approximate location of the Drain Field or Septic Tank and click to map the System, which will be represented as a point.
1.3 Once the System is mapped the Information Window will open and the Side Pane menu will change to the Edit Feature menu.
From here, you could enter the System information in the Edit Features menu, but for this example you will use a Form to enter System information and add system components.
In the bottom left corner of the System Information Window select 'Show Form' to open the Form view.

Select Show Form to Open Form
Adding System Information Using a Form
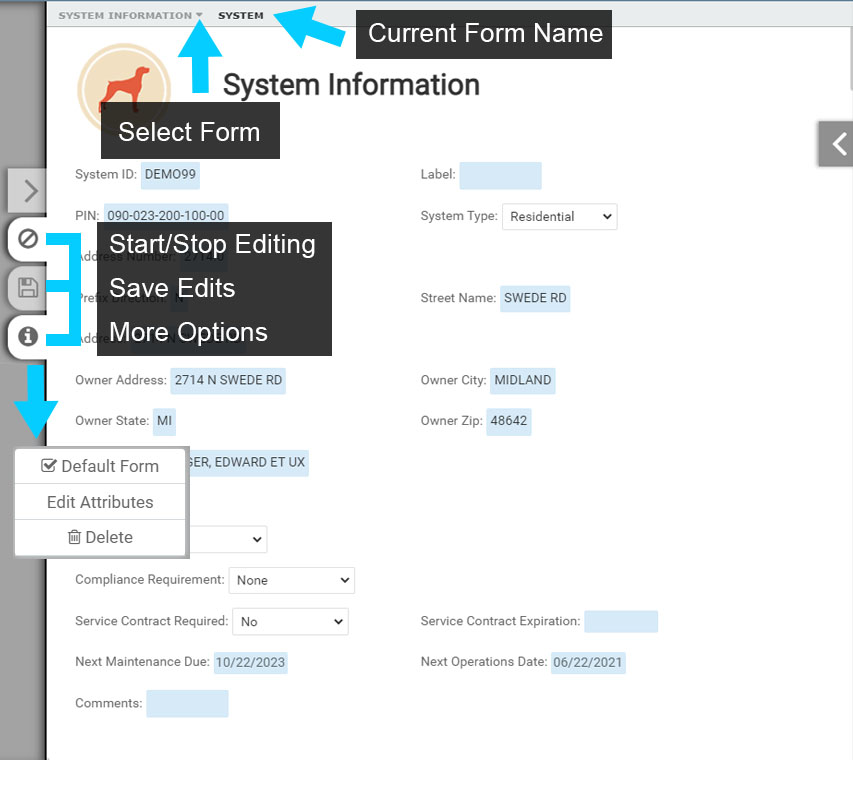
2.0 With the Form open, use the drop down menu to select the 'System Information' Form.
Note that there may be more than one type of System Form that is available and there will be some Forms that are already in place for your use. You can use the existing Forms as is, modify them to better fit your needs and use any existing Form as a Template to create a new Form. This is covered in the Form Designer section.
2.1 Next, select the 'Edit' button to begin editing the Form. When the Form is in Edit mode the data entry areas will be highlighted blue.
2.2 Make the System Information Form the default Form for the current System by toggling on the 'Default Form' option. Select the 'i' button to open a new menu with the 'Default Form' option. When you select the current System point on the map the System Information Form will be the Form displayed by default.
2.3 Next, enter a System ID as that is required to add any additional components or O&M events, and enter any additional information for the System.
2.4 Select 'Apply' to save edits and enable adding system components and O&M events.
Note the Form is still in Edit mode and you will continue to Edit in this example. However, you can always close an Edit session by selecting 'Close'.
Form Overview
Adding System Components Using a Form
3.0 With the Form in Edit mode, scroll down to view the system components that can be added to the System.
Next to each system component is a 'Add to FEATURE NAME' (+) button, which is used to add the corresponding component to the Form.

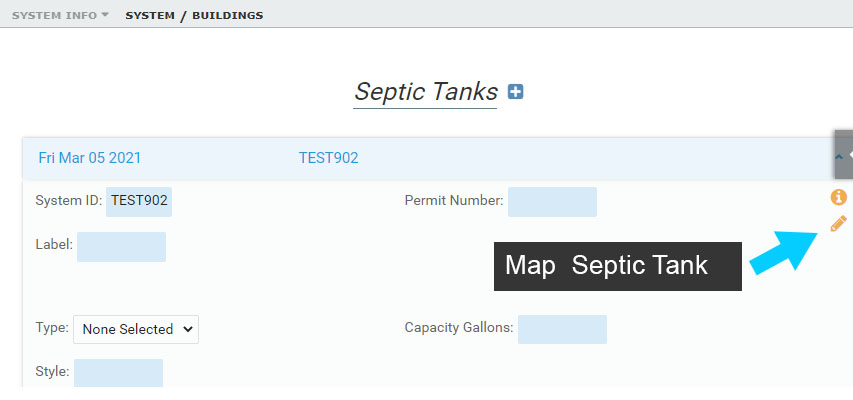
3.1 Select the 'Add Septic Tanks' button to add a new Septic Tank to the System.
Once the Septic Tank is added to the System, you can enter information (Type, Capacity, etc.) about the Septic Tank into the Form. Select 'Apply' to save the information and continue editing.
If choose to map the Septic Tank, select the 'Add to map' (pencil) button, which will open the Create Features menu used to map the Septic Tank.
Once the Septic Tank is mapped, the Form will open again. Note that the pencil button will no longer be present next to the Septic Tank because the Septic Tank has now been mapped.
If you don't map the Septic Tank, you can continue editing and add the next component.
You can also map a feature, like the Septic Tank, prior to entering information about the Septic Tank in the Form. Following this option you would add information about the Septic Tank once it is mapped.
Mapping a Feature From a Form
3.2 Follow the steps used to add the Septic Tank, and add a Drain Field using the Form, including mapping the Drain Field.
3.3 Next, add a new Soil Boring, but map the location of the new Soil Boring first, then add the Soil Boring information.
Once a Soil Boring is added, you will need to add Soil Horizons to the Soil Boring. Add a new Soil Horizon(s) to a Soil Boring using the Form.
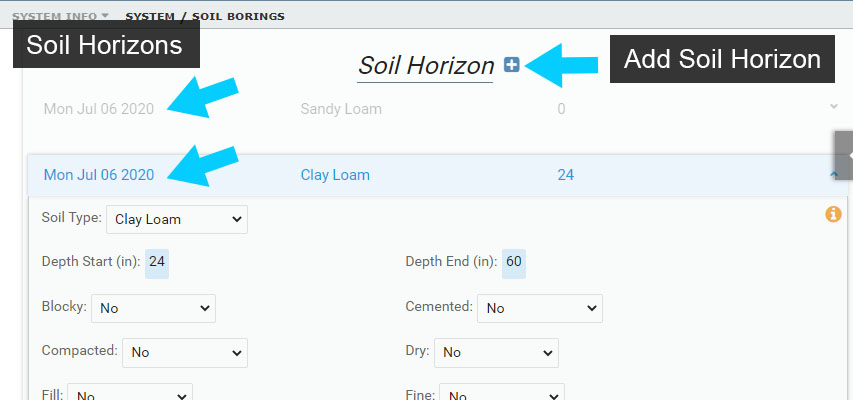
Adding/Viewing Soil Horizons
Editing/Deleting Components Using a Form
4.0 Forms provide the ability to make edits to update component information and the ability to delete a mapped component or a tabular record (not mapped feature).
Editing with Forms does not remove the ability to use the Side Pane menus to update component information for any mapped feature (septic tank, drain field, custom point, line, and polygon, soil borings, etc.).
Additionally, any spatial edits to a mapped component, such as moving or rotating, are still conducted using the Side Pane menus.
4.1 To begin editing select a System point or select a mapped component
4.2 If teh Form is not automatically displayed after selecting a System point or mapped component, select 'Show Form' in the Information Window.
Select Show Form to Open Form
4.3 To start editing in any Form, select the 'Edit' button.
4.4 To edit information in the Form simply reselect values/dates where present and re-enter values where manual entry is required. Be sure to select 'Apply' to save any edits.
4.5 To delete a mapped component or tabular record (not mapped) select the 'More information' (i) button.
4.6 Next, select delete from the More information menu to delete the corresponding mapped component or tabular record.
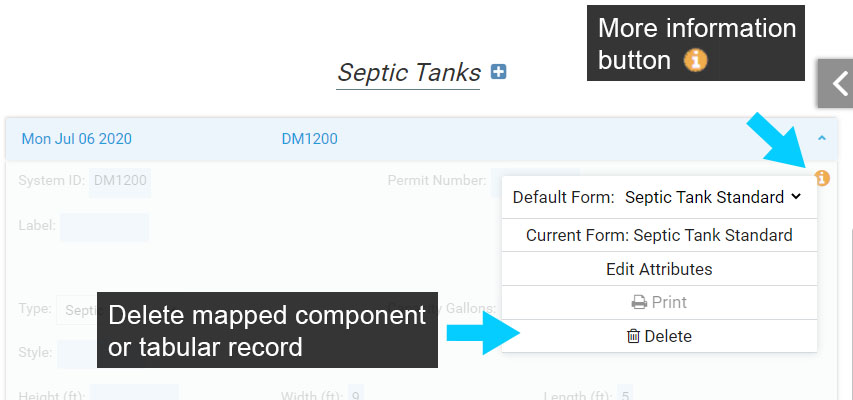
Delete Mapped & Not Mapped Components and Events