2.0 Field Preparation & GPS
Before visiting a field location there are some important ideas to understand regarding working in an offline environment. Field work may also include using GPS to map data in FetchEH, so this section reviews considerations for working in the field, which may include working offline, and working with GPS technology.
Topics Menu
- Offline Versus Online:
Understanding the difference between working in Offline and Online environments.
- Preparing For Offline Work:
Overview of preparing to work in an Offline environment, including creating map tiles, going Offline and Synchronizing mapped data.
- GPS Overview:
Overview of GPS and how it can be used in FetchEH
- GPS Technology:
Understanding internal and external GPS, and an overview of other technology used with GPS, such as devices and browsers.
- Using GPS to Map Features:
Use GPS to collect a Soil Boring and understand how GPS can be used to map other features, or to support additional mappigng workflows.
2.1 Offline Versus Online
FetchEH, like any other web based mapping service requires a data connection (4G LTE, 4G, WiFi, etc.) to view map layers and information. For many areas this will not be a problem, but it is likely that there are also areas where there is limited or no data connectivity, which will require a different approach to ensure access to base map layers while in the field.
In areas where a good data connection is available conducting field work does not require use of the 'Offline' mode. Areas that have a limited data connection or no data connection will require working in the 'Offline' mode to access limited base map layers, like imagery and transportation layers, and to conduct editing, which may be limited by how well base map layers perform.
Working in the 'Offline' mode depends on a cache (temporary storage) that contains map tiles of locations recently viewed in FetchEH. Because caches behave differently by device and browser, map tiles may not always be available or perform as expected in the 'Offline' mode.
2.2 Preparing To Go Offline
Preparing to go 'Offline' is a relatively simple process, but there are a couple of important aspects to understand that will ensure success. The 'Offline' workflow involves the following steps:
Create Tile Collection (cache) for work area.
Conduct field mapping in 'Offline' mode.
Synchronize mapped data.
2.21 Creating Map Tiles
When working in the 'Offline' mode FetchEH depends on the map tiles stored in the cache to display base map information, such as imagery and roads.
It is important to understand that a cache is stored on the device (tablet, laptop, smartphone) and the size of the cache varies, and may perform differently in regard to when, and what items are cleared from the cache.
For this reason, we recommend creating a cache over small geographic areas no larger than approximately 40 acres.
The following steps are used to create map tiles in a cache. Remember to create a cache while you have good data connectivity as it will not be possible to create a cache when a data connection is not available.
1 Start by panning/zooming to the area o the map that you will be conducting field work. Zoom in so that the area displayed on the map is approximately 40 acres.
2 Next, zoom in one level at a time until you have reached the maximum zoom level. Be sure to let the imagery load at each zoom level. This process creates the map tiles that will be stored in the cache.
3 Finally, pan around the general work area and be sure to let the imagery load after each pan.
At this point the map tiles that were navigated (pan/zoom) in the steps above will be in your cache. Do not close FetchEH. You will move to 'Go Offline' step below.
2.22 Go Offline
Going 'Offline' prepares the application to operate with no data connection. For best results we recommend going Offline once the map tiles/cache is created.
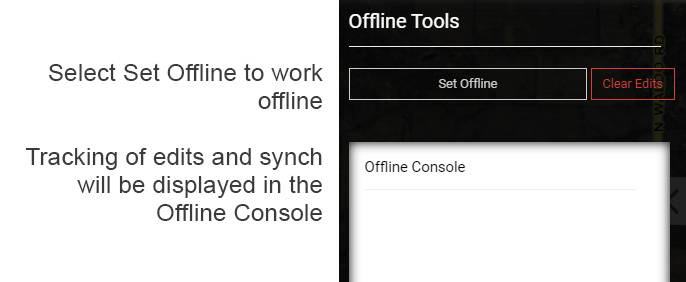
1 To officially go Offline select the 'Set Offline' button located on the Offline Tools menu.
After selecting 'Set Offline' the button label will change to 'Set Online' and a notification will appear on the bottom right of the screen indicating you are in 'Offline Mode' as displayed below.
 Set Application To Offline Mode
2.23 Synchronize Mapped Data
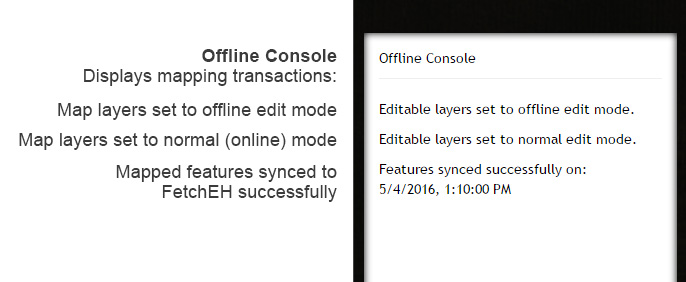
When using the application in Offline mode all features mapped in the field are stored on the device using the cache.
Features mapped in Offline mode will appear with a green dashed line around them until they have been successfully synchronized in 'Online' mode. To synchronize any mapped features to FetchEH, the application needs to come back 'Online' as described below.
1 To go from Offline to Online select the 'Set Online' button located in the Offline Tools menu. Note that you will need to be in a location with good data connectivity prior to going back Online.
To verify offline features are synced, you should see a message in the Offline Console:
"Features synced successfully on:" with the date and time.
We recommend that after being Offline, you set the application Online as soon as you are back at the office or you are in an area with good data connectivity. This will ensure the newly mapped features are uploaded to a secure environment in the Cloud. Any features mapped in the field using the Offline mode that have been uploaded to the Cloud will appear in the application for all users.
 Offline Console
2.3 GPS Overview
The use of GPS in the field requires an understanding of GPS technology and its application. Variables, including the device type, browser and GPS technology all have impacts on the performance and accuracy of GPS data collected in FetchEH.
FetchEH provides the option to use either internal or external GPS, with external GPS generally offering improved accuracy. GPS can be used to map features like Soil Borings, Wells, Tank Lids/Risers, and to map the corners of Buildings, Drain Fields and Septic Tanks. Often mapping a feature like a Building, Drain Field or Septic Tank is completed in a desktop environment using GPS points as a guide.
In general, most external GPS Units that provide Bluetooth (BLE) can connect to a device and subsequently be used in FetchEH. Note that connecting to a device requires software provided by the GPS technology being used.
2.4 GPS Technology
There are two general GPS technologies that can be used as described below.
Internal GPS - available on most tablets and smartphones. While there may be exceptions to this rule, in general internal GPS, is less accurate than what can be achieved using an external GPS unit.
External GPS - external GPS units are used with Bluetooth to connect to a device. External GPS units normally require a second application from the GPS technology to establish a Bluetooth connection to a device.
Amalgam does not formally recommend one particular GPS technology over another. Clients have had success with a number of GPS technologies and we are happy to share those experiences with those pursuing GPS.
Other Technology -FetchEH performs best using Google Chrome as a browser technology. FetchEH works with other browsers, including Safari and others, but performance may not be as consistent as that experience on Chrome.
Device technology is rapidly evolving, but based on our own testing and the experience of clients, FetchEH performs best using a device with either Android or iOS as the operating system. This is especially relevant for using external GPS. Devices with a Windows operating system perform well, but do require some additional steps to work with external GPS.
2.5 Using GPS to Map Features
This section will provide an overview of using GPS to map features in FetchEH. It is assumed that you have successfully connected an external GPS unit to a device or are using the device GPS. If you need assistance connecting external GPS to a device, contact us.
It is important to note that while we are familiar with several common GPS technologies and how they interact with a browser and operating system, all of these technologies individually are evolving rapidly. A combination of technologies that perform well today may not perform the same way in a month. Ultimately, we do what we can to support FetchEH reading GPS technologies, but we have no control third party technologies and changes they make.
Enable GPS Location
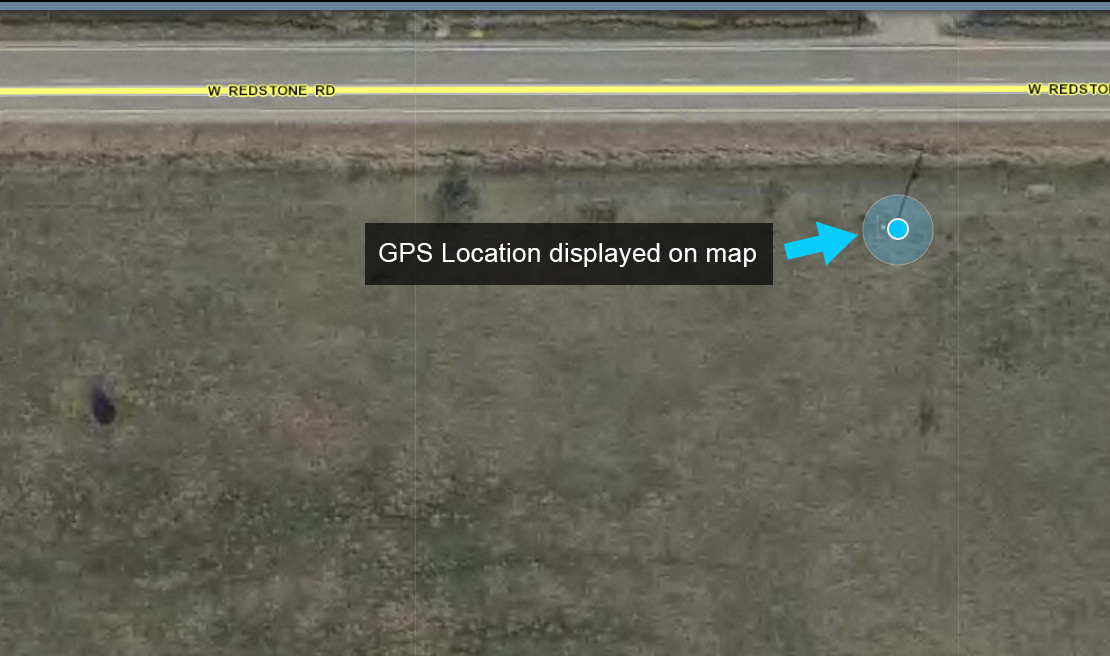
1.0 In order to view your location on the map using internal or external GPS select the 'Toggle GPS/Location Marker' button from the Main Menu.

Once the GPS is enabled you should see your location on the map as a standard 'blue dot' marker. The location may take time to register accurately depending on the GPS technology and the surroundings.
You can now use the GPS location to create new point features, like Wells or Soil Borings, or use the GPS location as a starting point to create features like Buildings, Drain Fields and Septic Tanks. This is described more in Section 4.3.
Note that the GPS location displayed on the map is similar to showing your location on a smartphone with Google Maps. Your location is dynamic and updates frequently based on your movement and information gathered from satellites.
 GPS Location On Map
Using GPS Location to Create Features
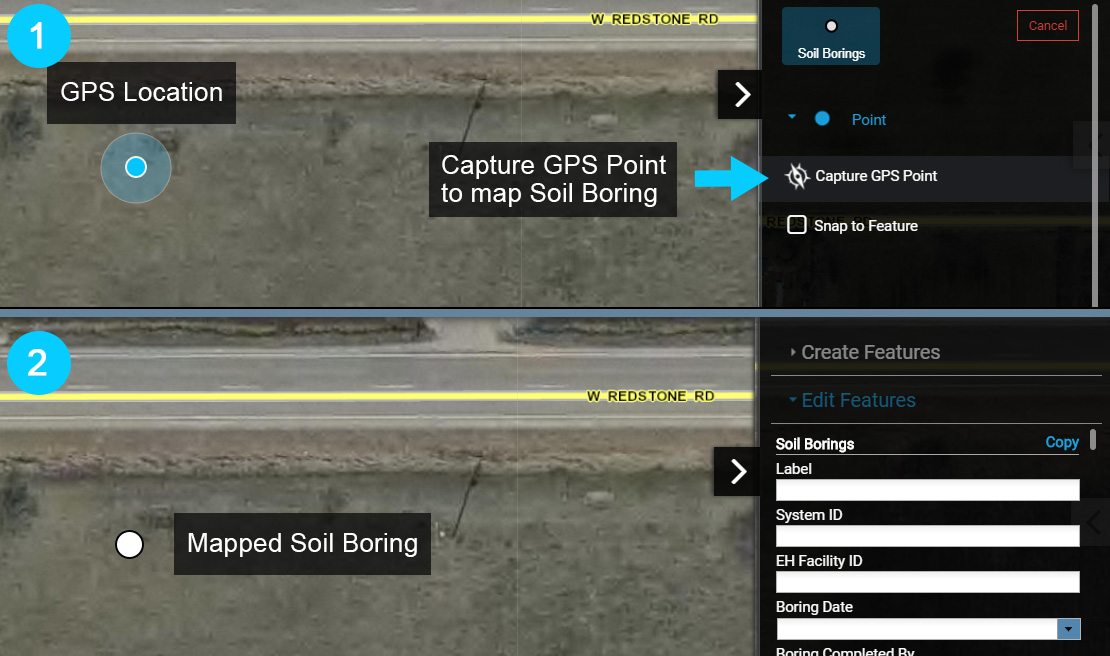
2.0 With GPS enabled, select the 'Feature Editing Controls' button from the Main Menu and then select Create Features.

2.1 In the Create Features menu, select the Soil Boring.
2.2 When GPS is enabled the 'Capture GPS Point' button will be active in the feature menu (Soil Borings here). The 'Capture GPS Point' button is used to map a feature, such as a Soil Boring, at the current GPS location.
Select the 'Capture GPS Point' to map a new Soil Boring.
Note that when the 'Capture GPS Point' is used to map a feature, the feature (Soil Boring here) will be mapped and be coincident with the GPS location.
Selected Features
2.3 Select the Soil Boring to open the Information Window. Note that there are two features selected (1 of 2) with one being the Soil Boring and the other being the GPS Point.
Use the Page arrow at the top right of the Information Window to page between the Soil Boring and GPS Point.
Note that you can add a label to a GPS Point using the Edit Features menu. There is also a general Accuracy field that provides the accuracy in meters.
2.4 To view the GPS Point, use the 'Toggle Layers' option on the Main Menu to open the Layers & Legend menu. In the Fetch EH Layers group, go to Soil Borings and toggle off the visibility checkbox.
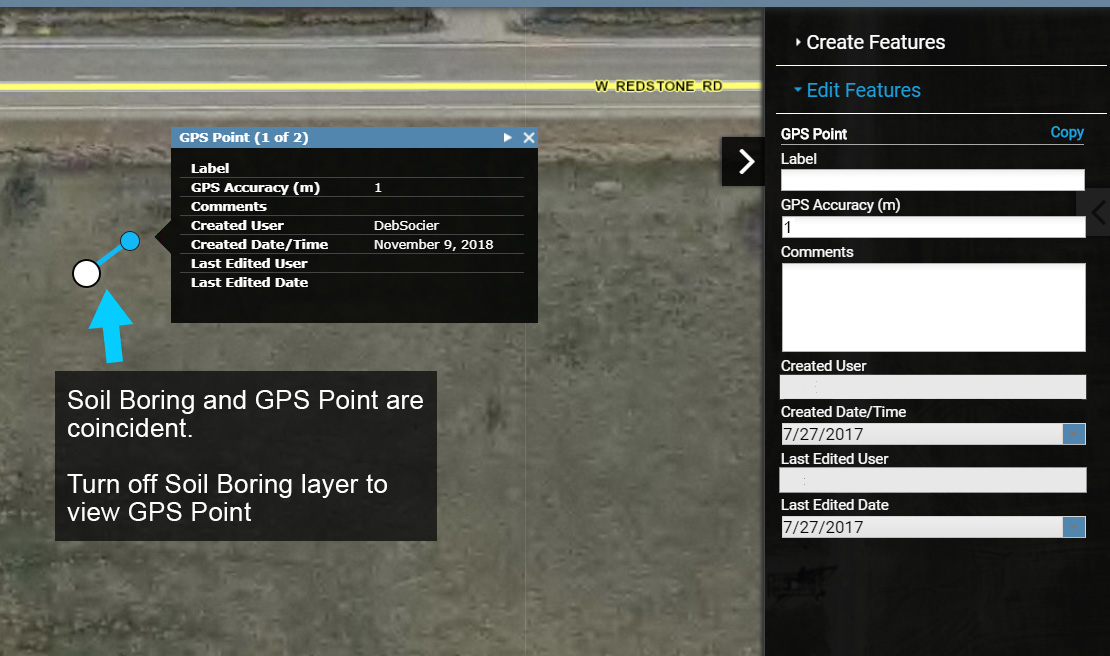
GPS Mapped Point
Using GPS to Map Other Features
Using GPS to map other features follows a similar workflow as that described above for the Soil Boring.
The primary difference in how different features are mapped using GPS, comes down to the feature type. Feature types and mapping workflows include:
Points: points are mapped with a single Capture GPS Point action and include features like System, Soil Borings, Wells and Custom Point.
Lines: lines are mapped using at least two (2) Capture GPS Point actions and include features like Measurement Lines, Septic Lines and Custom Lines.
Start a line by selecting Capture GPS Point, walk to a new location and select Capture GPS Point again to complete a line segment. Continue this process for each additional line segment that is to be mapped. Select 'Finish' to complete the mapping process.
Areas: areas are mapped using at least three (3) Capture GPS Point actions and include features like Buildings, Septic Tanks, Drain Fields and Custom Area.
Start an area by selecting Capture GPS Point, walk to a new location and select Capture GPS Point, walk to a third location and select Capture GPS Point again to complete an area made up of three (3) segments. Continue this process for mapping additional segments of an area. Select 'Finish' to complete the mapping process.
Other Common GPS Workflows
Most GPS units won't offer the accuracy to reliably map a feature that has 90 degree corners, such as a Building, Drain Field and Septic Tank. Therefore, a common practice is to capture a corner(s) using GPS and then to complete the mapping on a desktop.
For example, you capture four corners of a Drain Field using GPS in the field. Back at the office you map the Drain Field as a rectangle and then elect to 'snap' it to a GPS point that represents one of the corners. You may also elect to place the Drain Field so that any spatial error is distributed approximately equally over the GPS points representing the corners.
Other common workflows include capturing other features, such as LP Gas, Water Line, Gas Line, Swales and more using GPS and Custom Points, Lines or Areas.
Contact us for any additional questions regarding GPS and FetchEH.